GETTING STARTED
Manage your workspace settings
Workspace settings is where you control how your business runs payroll in PayHr: your business profile and CRA payroll account, pay schedule, leave and vacation rules, team access and CRA remittance schedule. This guide explains each page, what its options mean, and what changes when you save.
It is for workspace owners and admins. Only owners and admins can change these settings. Finish workspace setup first (see Set up your business workspace).

 NARRATED TUTORIALWatch: Manage workspace settingsSee every step below in the actual PayHr screens, with captions.
Before you start
- Owner or admin access to the workspace
- Your CRA payroll account number, if you didn’t add it during setup
- Your CRA remitter type, shown on your remittance voucher or CRA account notice
- Your written overtime-banking agreements, if you plan to bank extra hours as time off
- Email addresses for any teammates you want to invite
01Open Workspace settings
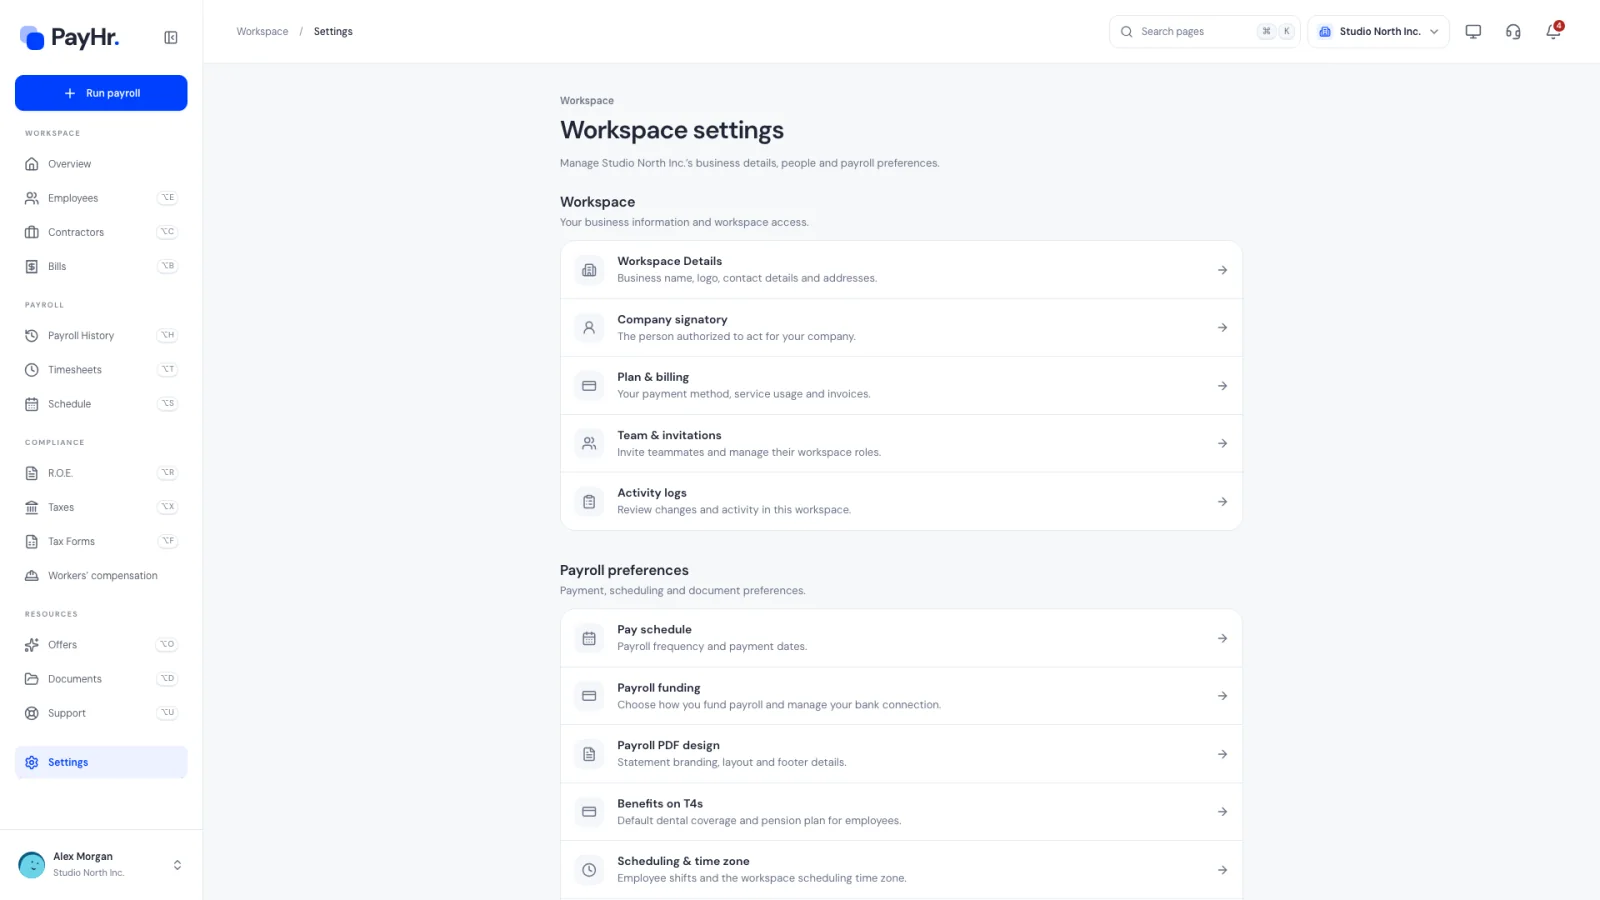
Open Settings from your workspace to reach Workspace settings. Pages are grouped into three lists:
- Workspace: Workspace Details, Company signatory, Plan & billing, Team & invitations and Activity logs.
- Payroll preferences: Pay schedule, Payroll funding, Payroll PDF design, Benefits on T4s, Scheduling & time zone, Leave policies, Overtime & vacation and Payroll years.
- Compliance & documents: ROE authorization, ROE contact, Document emails, Remittance schedule and Taxes & remittances.
Select any row to open that page. Every inner page has Back to workspace settings at the top.
02Keep your Workspace Details up to date
Workspace Details holds the business profile from setup. The shortcuts at the top jump to Company, Addresses, Payroll and Contact.
- Business identity: legal name, operating name, federal corporation number and description. Keep the legal name identical to your CRA records, because it is printed on pay statements, T4 slips and ROEs.
- Business address and Mailing address: your work location sets the business province PayHr uses for provincial defaults.
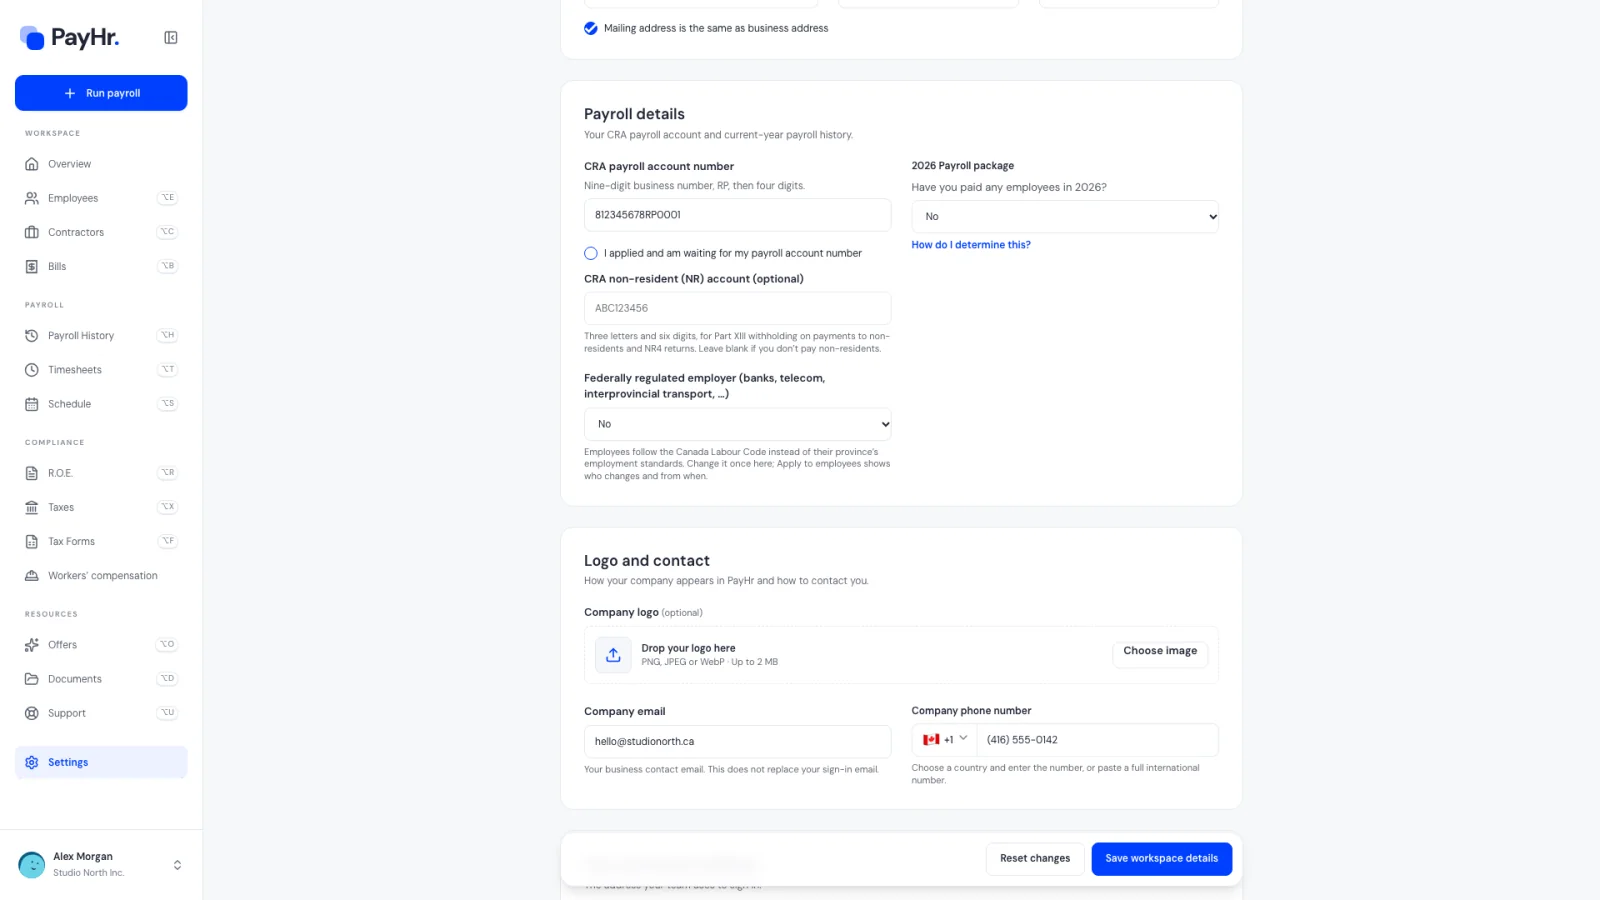
- Payroll details: add or correct your CRA payroll account number (nine digits, RP, four digits) and optional non-resident (NR) account. If you ticked “waiting for my payroll account number” during setup, add the number here before remittances or ROEs.
- Federally regulated employer: choose Yes only for federally regulated industries such as banks, telecoms and interprovincial transport. Those employees follow the Canada Labour Code instead of provincial employment standards. After a change, Apply to employees previews who is affected and from what date, and nothing changes on employee policies until you confirm.
- Logo and contact: your logo, company email and company phone. These don’t change anyone’s sign-in email.
Your workspace address is permanent and shown read-only. Select Save workspace details to save, or Reset changes to discard edits.
03Update the Company signatory
Company signatory is the person authorized to sign documents on behalf of your business. It shows the same form as setup: legal name, Canadian home address, job title, date of birth, phone number and Social Insurance Number.
For privacy, a saved SIN is never displayed. Leave the SIN field blank to keep it. If you change the signatory’s name or date of birth, enter the SIN again. Select Save signatory when done.
04Set your Pay schedule
Pay schedule controls when your pay periods run and when people are paid.
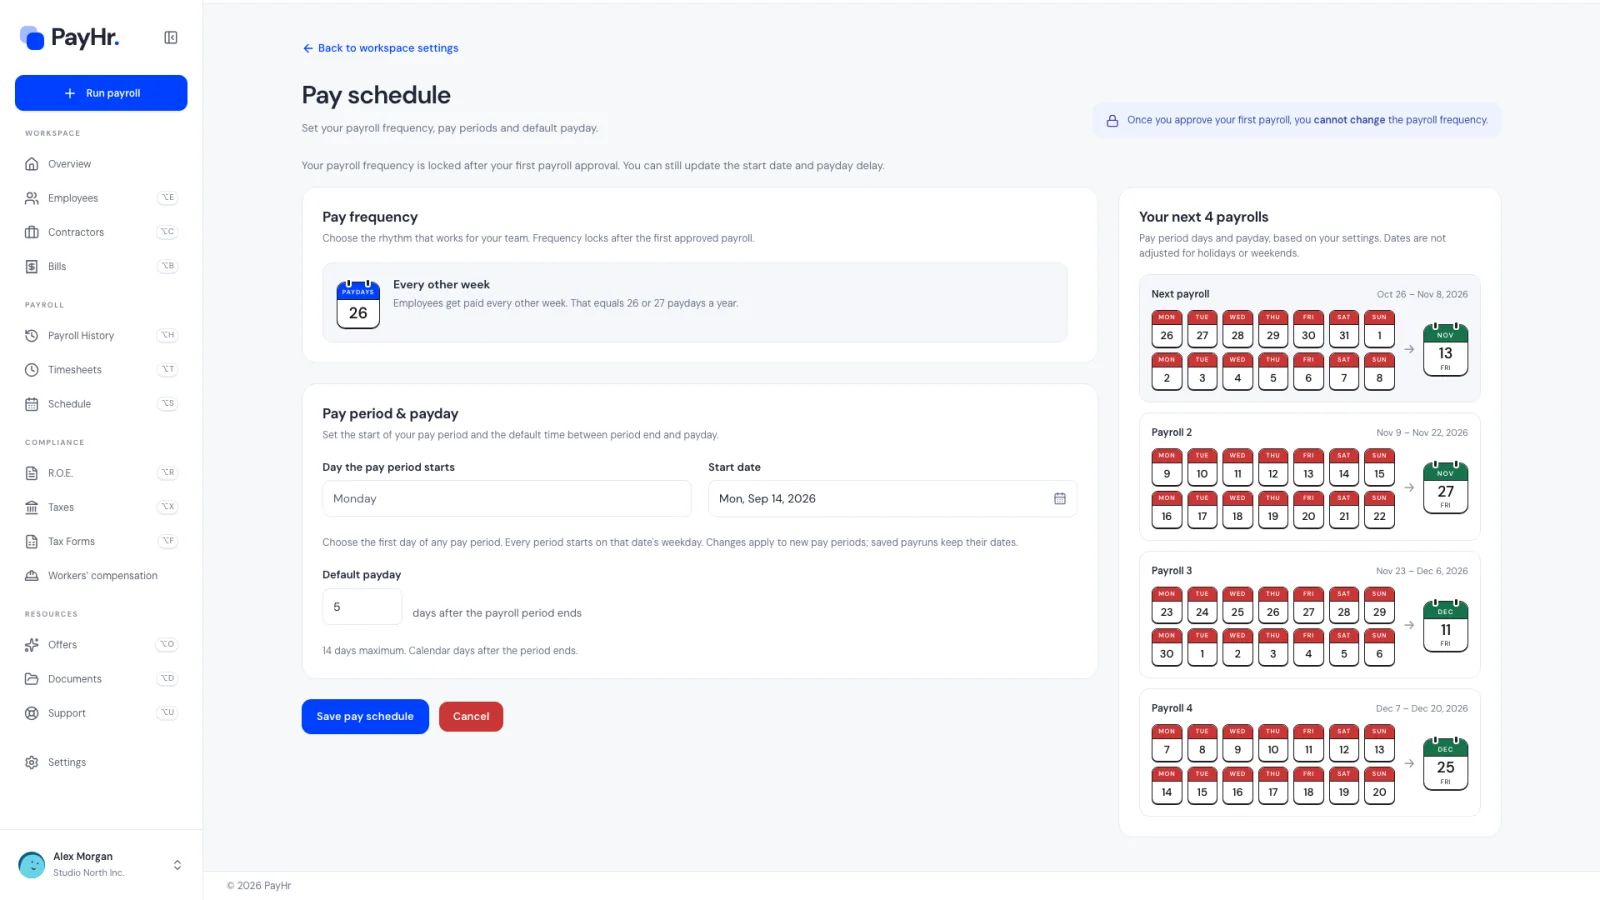
- Pay frequency: Every week (52 or 53 paydays a year), Every other week (26 or 27), Twice a month (24) or Once a month (12). The frequency also drives how income tax, CPP and EI are calculated on each cheque, so pick the one you actually pay on.
- Start date (weekly and every other week only): choose the first day of any pay period. Every period then starts on that weekday, shown under Day the pay period starts.
- Default payday: the number of calendar days after a period ends that employees are paid. The maximum is 7 for weekly, 14 for every other week, 15 for twice a month and 31 for monthly.
Your next 4 payrolls previews the period dates and paydays. Dates aren’t adjusted for holidays or weekends. Select Save pay schedule to apply it.
Once you approve your first payroll, the frequency locks. You can still change the start date and payday delay later, and changes apply to new pay periods only. Saved pay runs keep their dates.
05Choose Overtime & vacation defaults
Overtime & vacation sets two company-wide defaults. You can give one employee a different arrangement from their own Pay page, under Special arrangements.
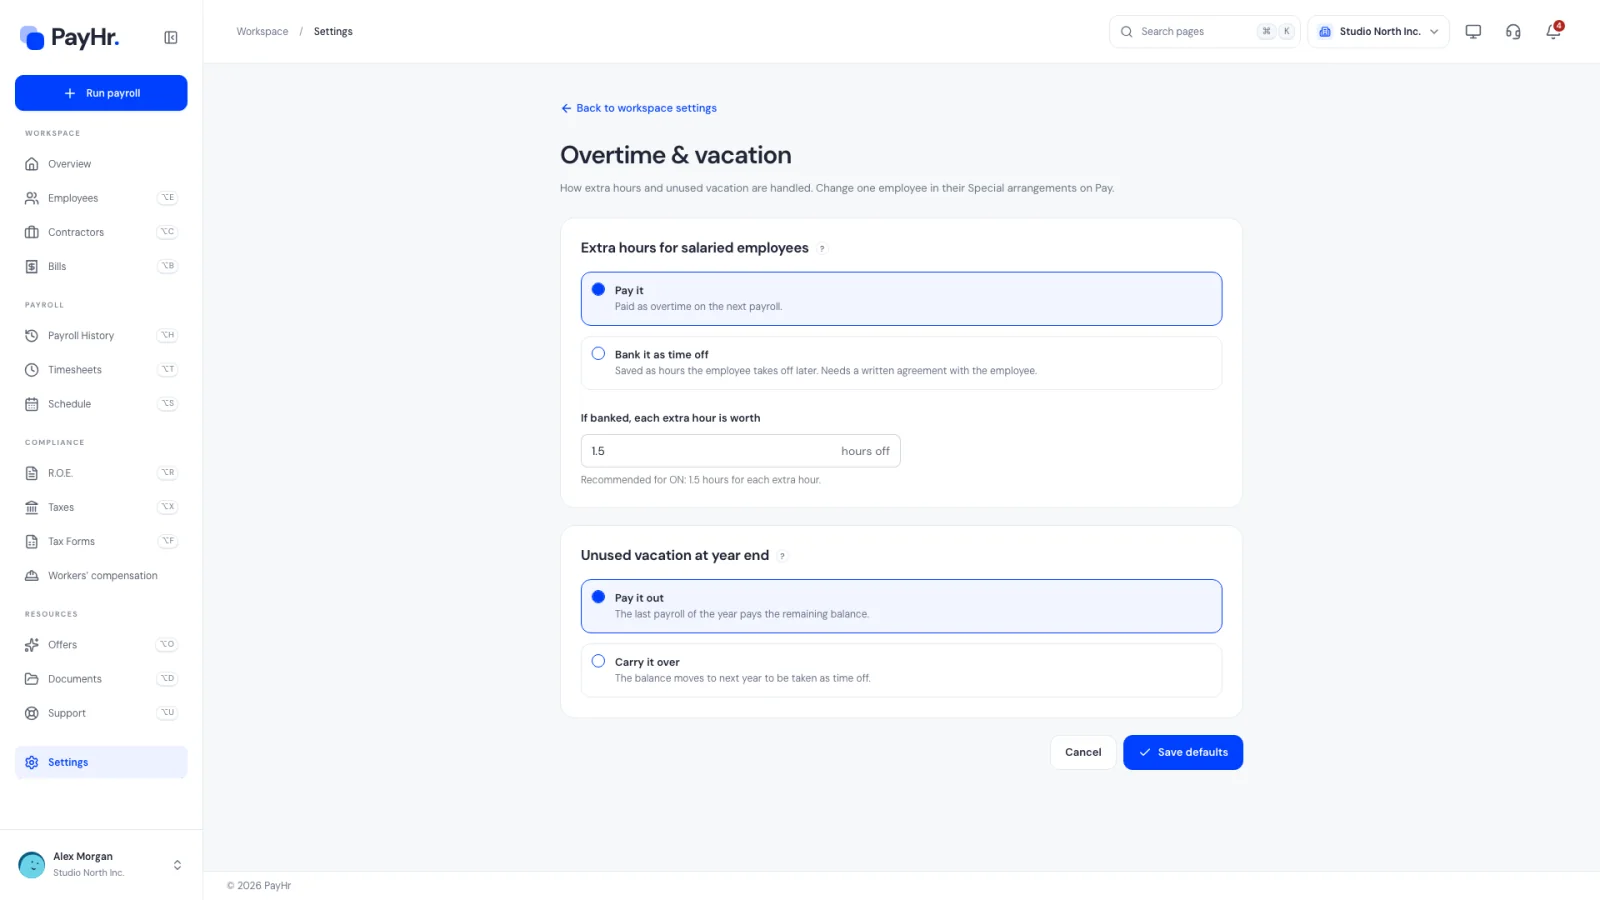
Extra hours for salaried employees covers hours beyond the normal weekly hours in an employee’s work schedule. Hourly employees are always paid overtime.
- Pay it: extra hours are paid as overtime on the next payroll.
- Bank it as time off: extra hours are saved as time the employee takes off later. Provincial employment standards generally require a written agreement with the employee to bank overtime.
- If banked, each extra hour is worth: how many hours off each banked hour earns, from 1 to 3. PayHr shows a recommendation for your province where one applies.
Unused vacation at year end applies to employees whose vacation accrues:
- Pay it out: the last payroll of the year pays the remaining balance.
- Carry it over: the balance moves to next year to be taken as time off.
Unused vacation is always paid out in an employee’s final pay. Select Save defaults.
06Manage Leave policies and Benefits on T4s
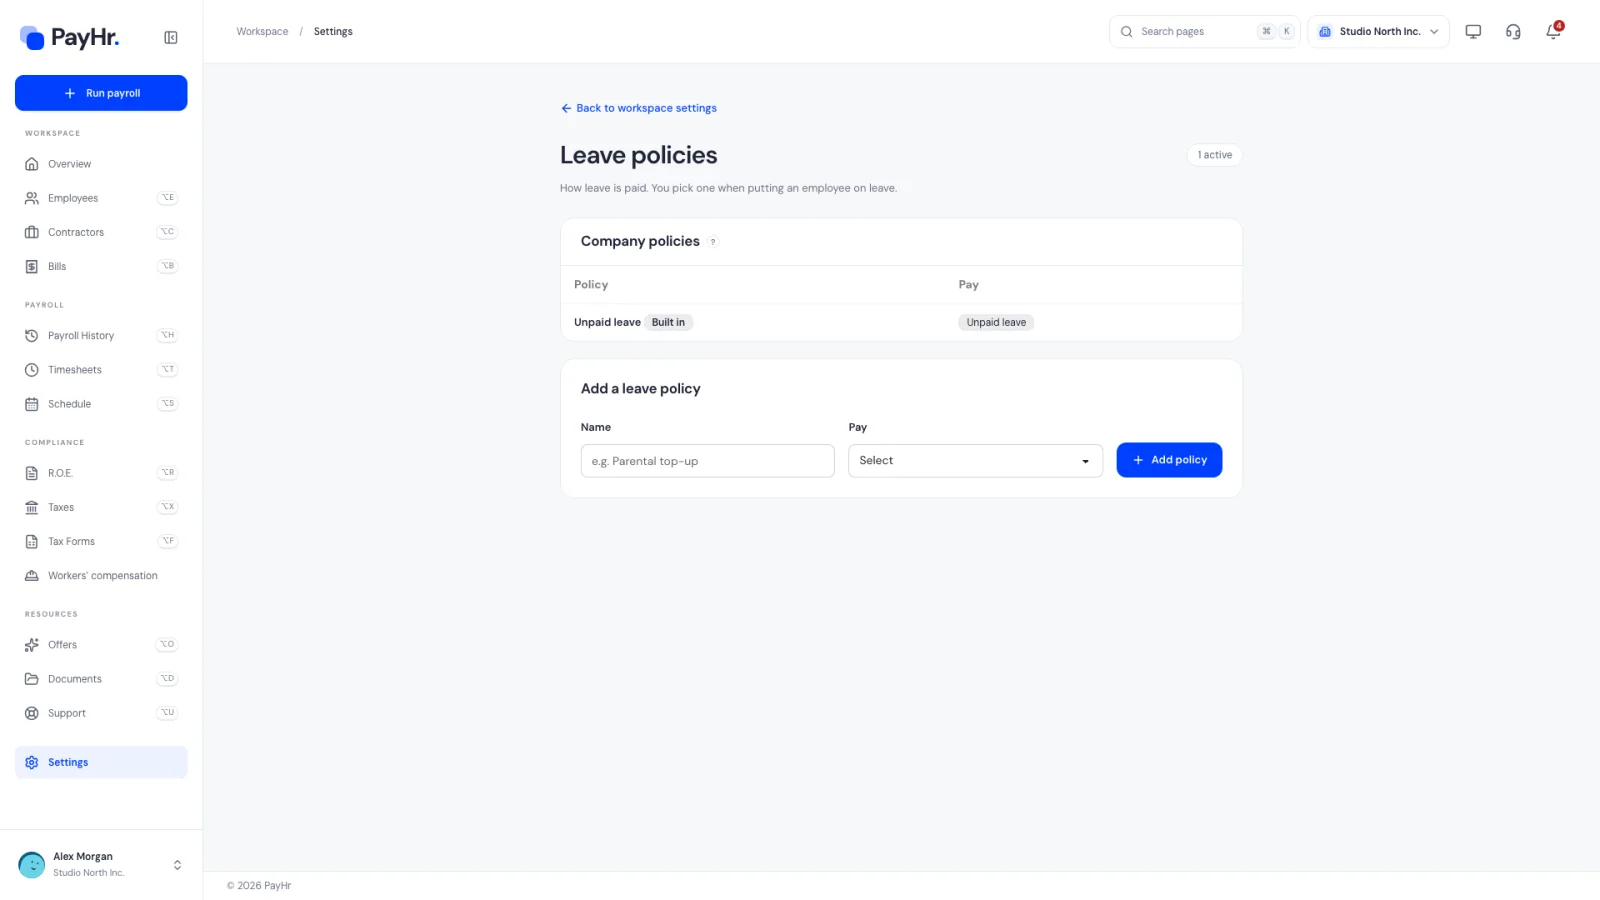
Leave policies decide how leave is paid. You pick one each time you put an employee on leave.
- Unpaid leave is built in, and is the default for statutory leaves like illness, parental, maternity and compassionate care.
- To add one, enter a Name (for example “Parental top-up”), choose Pay: Paid leave, Unpaid leave or Follow vacation policy (pays from accrued vacation), then select Add policy.
- Policies can’t be edited. To change one, Archive it and add a new one. Leaves already recorded keep their original policy.
Benefits on T4s sets company defaults printed on every employee’s T4. Dental coverage fills T4 box 45: whether employees could get employer dental benefits on December 31, from code 1 (no access) to 5 (employee and children). Pension plan number fills box 50 with your registered pension plan or DPSP’s seven-digit number; leave it blank if you have none. You can override either for one employee on their Pay page.
07Invite your team and review Activity logs
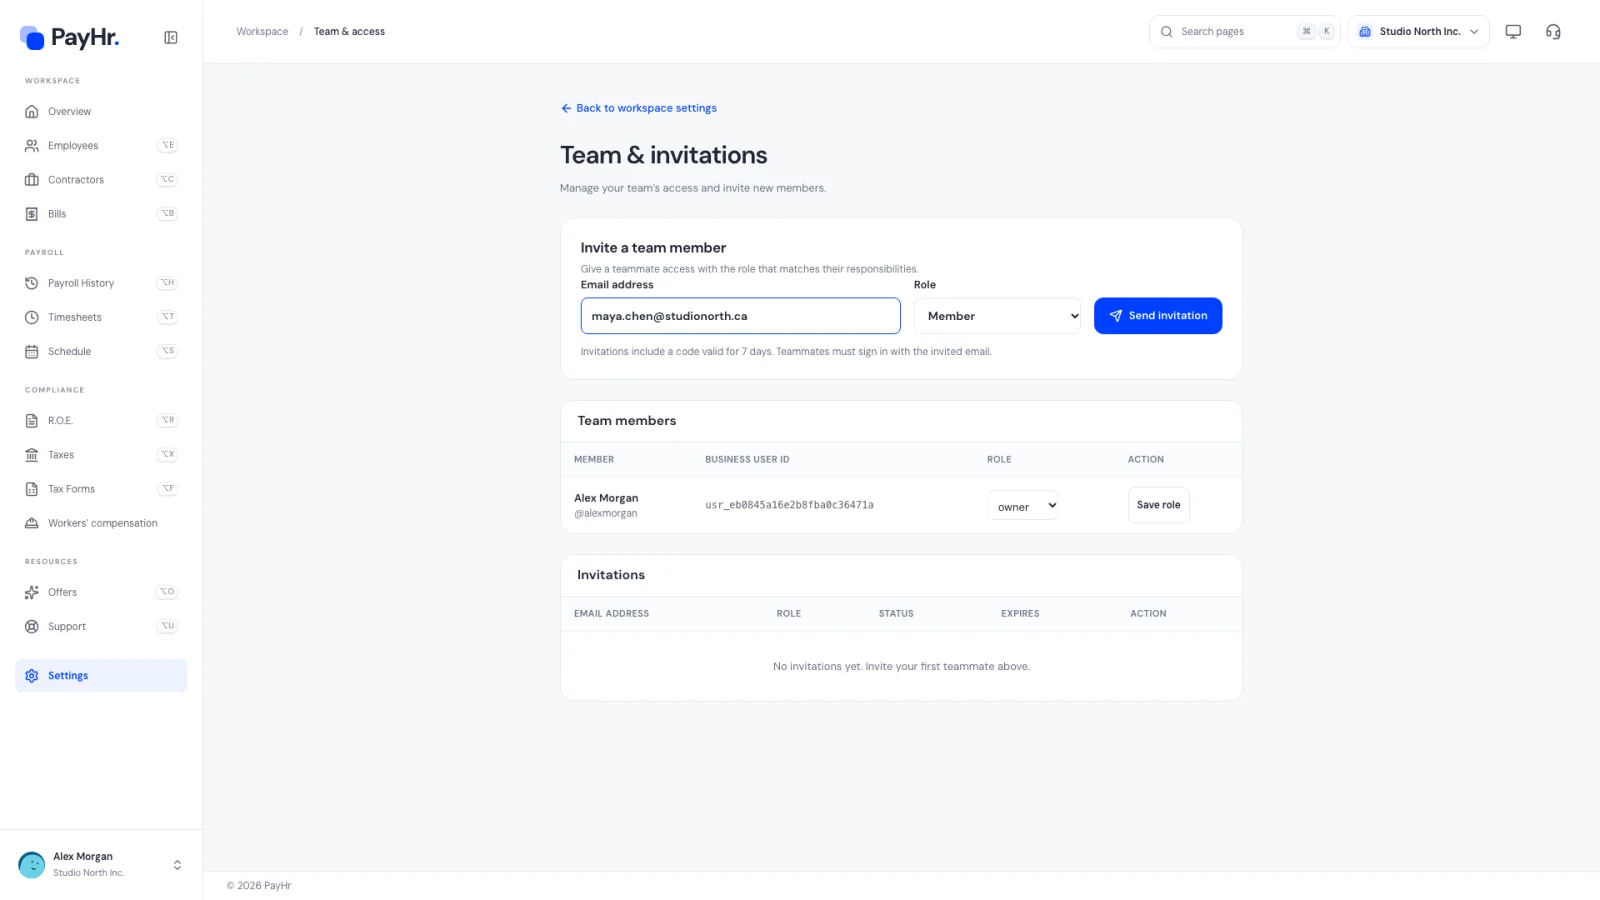
Team & invitations controls who can access the workspace. Enter an Email address, choose a Role and select Send invitation. Your teammate receives an email with a join code that is valid for 7 days. They must sign in with the invited email address, then choose Join Organization on their workspace chooser.
- Owner and Admin can change workspace settings and manage the team. Only an owner can invite admins or change roles.
- Member and Viewer roles can’t manage settings or the team.
- Pending invitations can be Revoked, which stops the join code working.
Activity logs records setup, invitations, membership and role changes, and saved settings, so you can see who changed what and when. Select Load older activity to go further back.
08Set your CRA Remittance schedule and ROE contact
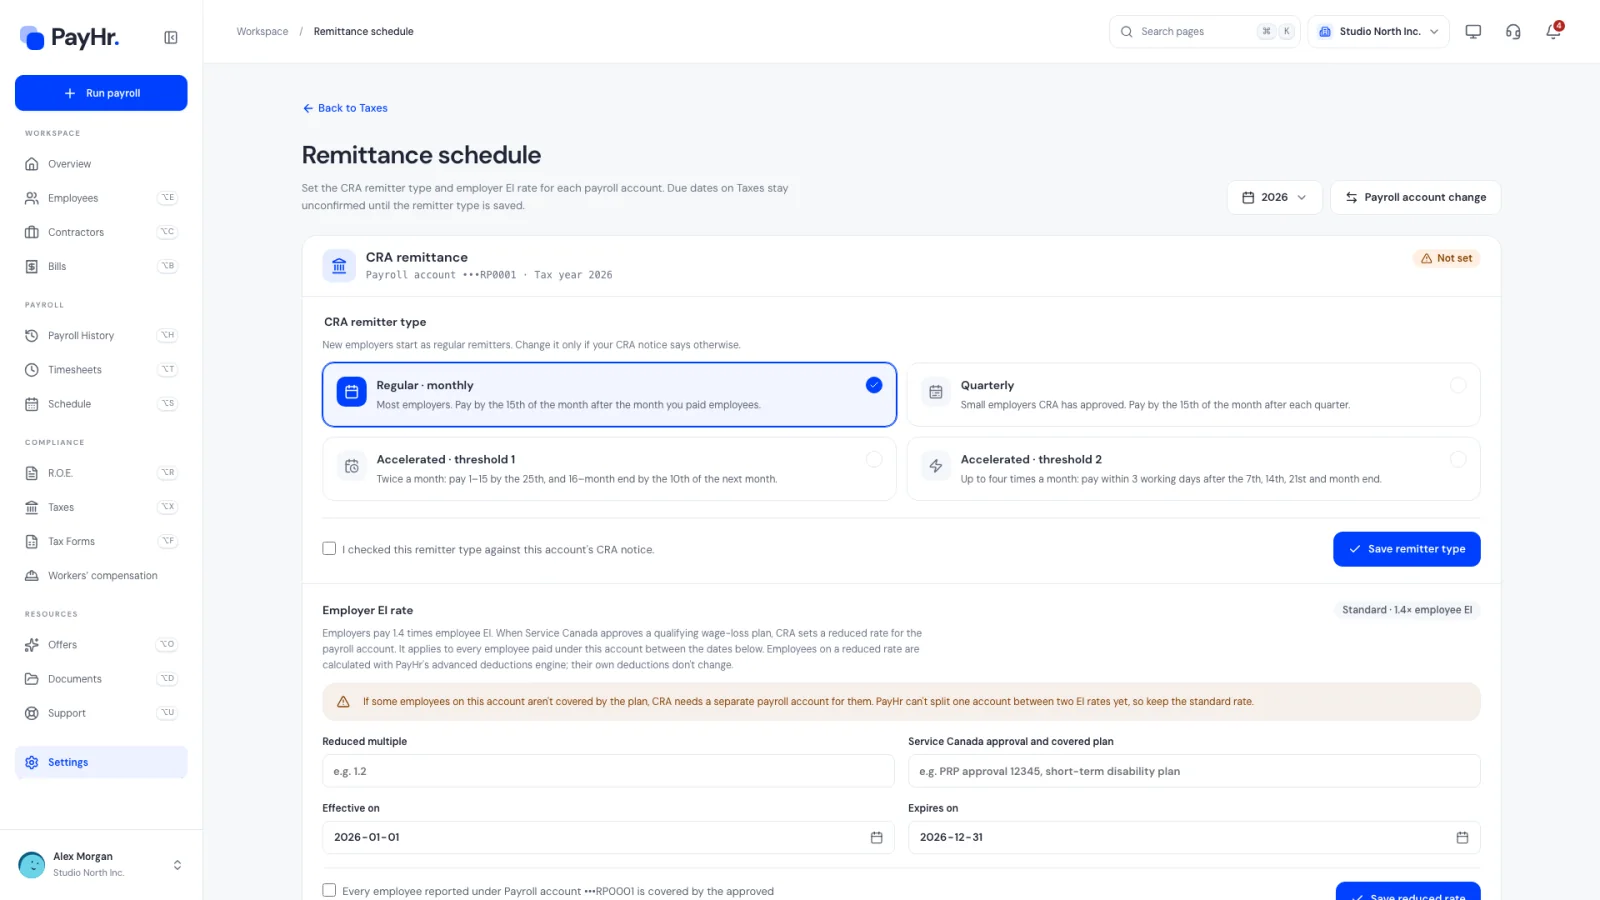
Remittance schedule tells PayHr how often you send source deductions (income tax, CPP and EI) to the CRA. There is one card per CRA payroll account. Due dates on Taxes stay unconfirmed until you save a remitter type.
- Regular · monthly: most employers. Pay by the 15th of the month after the month you paid employees. New employers start here unless the CRA tells you otherwise.
- Quarterly: small employers the CRA has approved. Pay by the 15th of the month after each quarter.
- Accelerated · threshold 1: twice a month.
- Accelerated · threshold 2: up to four times a month.
Tick I checked this remitter type against this account’s CRA notice and select Save remitter type. If the CRA later changes your type, choose the new one with an Effective on date and the CRA notice reference, then select Record schedule change. Payroll already accrued keeps its original schedule. The Employer EI rate section stays at the standard 1.4 times employee EI unless the CRA has given this account a reduced rate.
ROE contact sets the person Service Canada can reach about your Records of Employment. New ROEs fill in this person automatically, and ROEs already saved keep their original contact.
09Customize Payroll PDFs and manage Payroll years
Payroll PDF design controls what appears on employee pay statements and payroll registers: Show workspace logo, Show company name (with an optional display name), Show company address, and an optional footer note. Preview PDF opens your latest approved payslip with the new settings, without saving. Changes apply to future downloads, including older payrolls, but saved payroll amounts never change.
Payroll years lists each year with approved payroll. Each payroll year follows the payday. When a year is finished, close it from the year-end checklist on your Overview to start the next one. A closed year can be reopened. If its T4s are already filed with the CRA, PayHr warns you that any change to that year’s pay will need amended T4s.
Questions people ask
Can I change my pay frequency after running payroll?
Not once a payroll has been approved: the frequency locks to keep pay periods and tax calculations consistent. You can still change the start date and the payday delay, and changes apply to new pay periods.
Which CRA remitter type am I?
It is on your CRA remittance voucher or account notice. Most new employers are regular (monthly) remitters. The CRA notifies you if your type changes, usually based on your average monthly withholding from two years earlier.
Do I need an agreement to bank overtime?
Generally, yes. Provincial employment standards usually require a written agreement with the employee before overtime is banked as time off. PayHr shows the agreement requirement on the Overtime & vacation page and a recommendation for your province where one applies.
Why can’t I edit a leave policy?
Leaves already recorded refer to the policy they were created with. To keep that history accurate, policies can only be archived and replaced. Archiving doesn’t change leaves already recorded.
What can a Member or Viewer do?
They can’t manage workspace settings, billing or the team. Use Admin for someone who should help run settings, and keep Owner for the people accountable for the business.
Where do I change my own name or sign-in email?
Those belong to your personal PayHr account, not the workspace. Open Account settings from your profile menu. See Sign in and keep your account secure.