GETTING STARTED
Set up your business workspace
After you create your PayHr account, you set up a workspace for your business. This guide walks through every screen of Create Organization: business details, the company signatory, and the Free Plan. It explains what each field is for and why it matters for Canadian payroll.
It is for business owners setting up PayHr for the first time. Setup takes about ten minutes if you have your business and CRA details ready. Only the owner who starts setup can complete the business details step.

 NARRATED TUTORIALWatch: Set up your workspaceSee every step below in the actual PayHr screens, with captions.
Before you start
- A PayHr account you can sign in to (see Create your PayHr account)
- Your business type and registered legal name, plus the operating name if you use a different one
- Your business address in Canada, and a mailing address if it is different
- Your CRA payroll account number (nine-digit business number, RP and four digits), or confirmation that you have applied for it
- Whether you have already paid any employees this calendar year, through PayHr or anywhere else
- A company email and phone number, and your logo (optional)
- The signatory’s legal name, home address, job title, date of birth, phone number and Social Insurance Number
- A payment card or bank details for optional services (saved, not charged, when you finish)
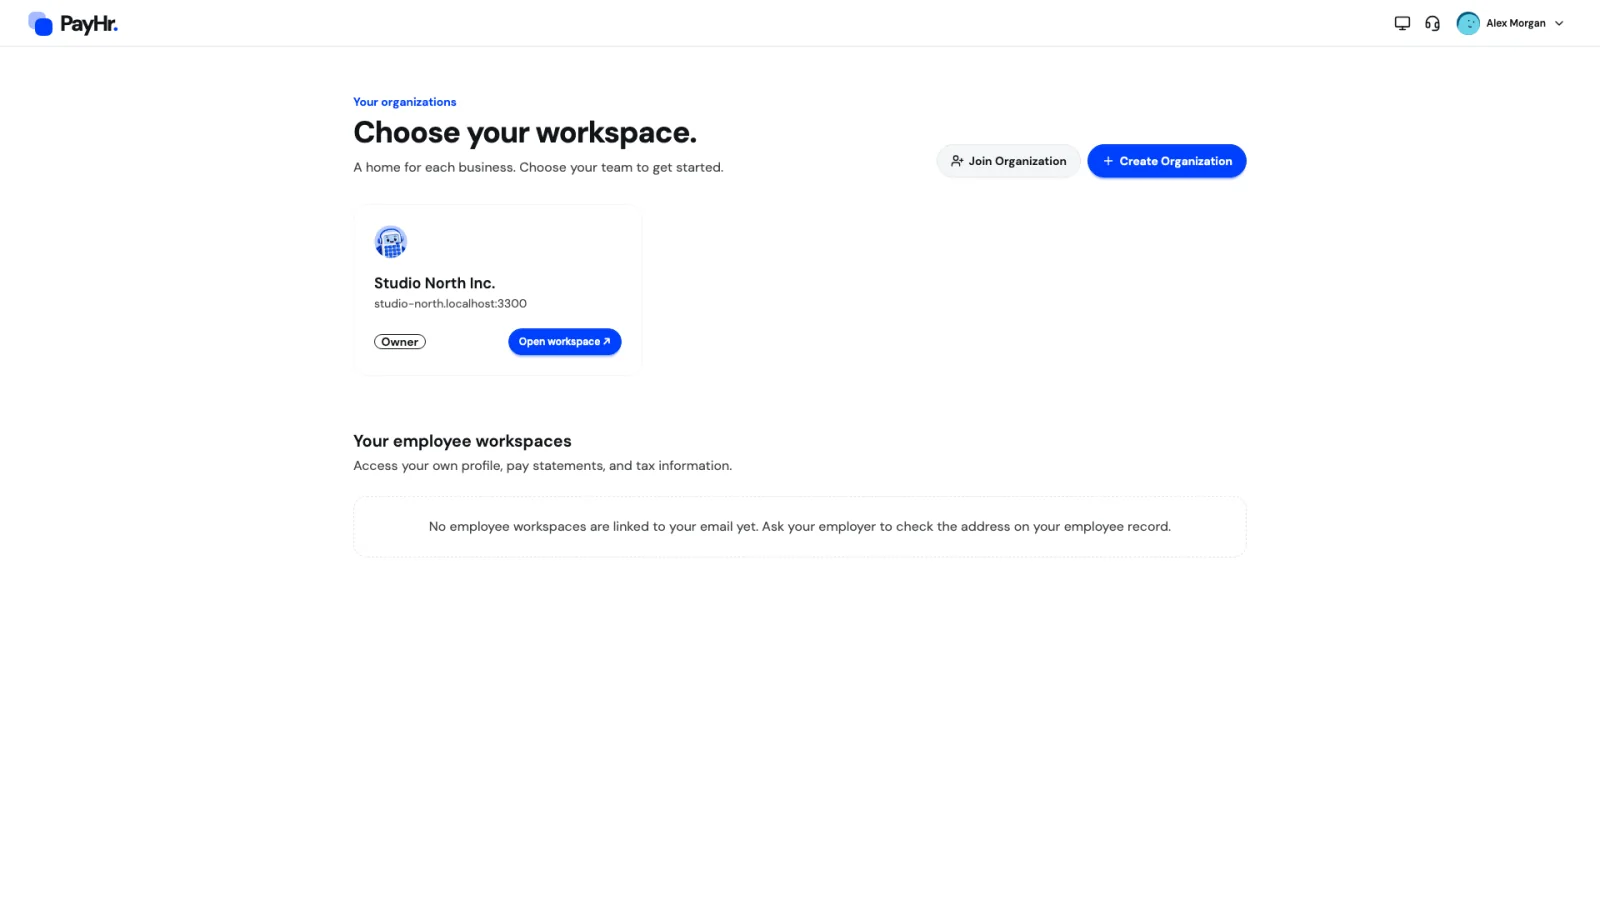
01Choose Create Organization on your workspace chooser
After you sign in, PayHr opens Choose your workspace. Each business you belong to appears as a card. Select Create Organization to set up a new business. You become its owner, the role with full control over settings, billing and team access.
Setup has three steps, shown in the left-hand panel: Business details, Company signatory and Payment method. PayHr saves your progress as you go. If you leave part-way, the organization appears on your workspace chooser with Continue setup →, and you pick up where you stopped.
- Joining an existing team instead? Choose Join Organization and enter the code from your invitation email. You don’t need to create anything.
- Each account can own up to ten organizations.
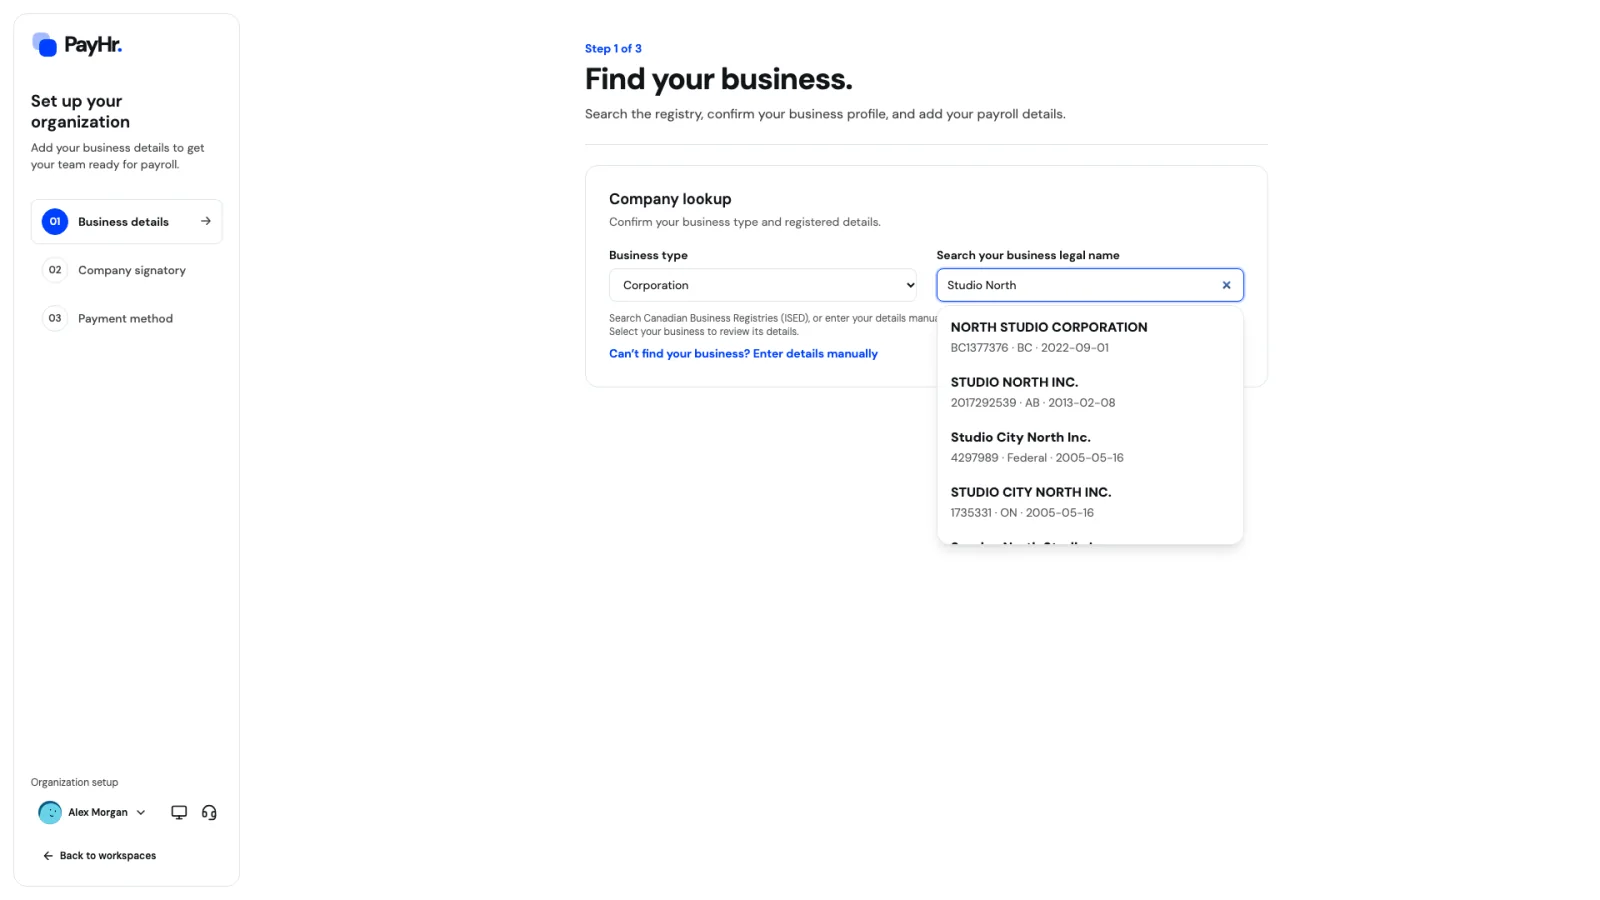
02Find your business in Company lookup
Start with Business type: Corporation, Partnership or Sole proprietorship. For a sole proprietorship, use your own full legal name as the business name, because that is how the CRA knows the business.
Then type your legal name in Search your business legal name. PayHr searches Canadian Business Registries, run by Innovation, Science and Economic Development Canada (ISED). When you pick a match, PayHr fills in only what the registry returns: legal name, federal corporation number, year established, and city and province where available. It never makes up a payroll account number or street address, so check every field afterwards.
If your business doesn’t appear, which is common for provincially registered businesses and sole proprietors, select Can’t find your business? Enter details manually. Either way you continue to the same form.
03Confirm your Business identity
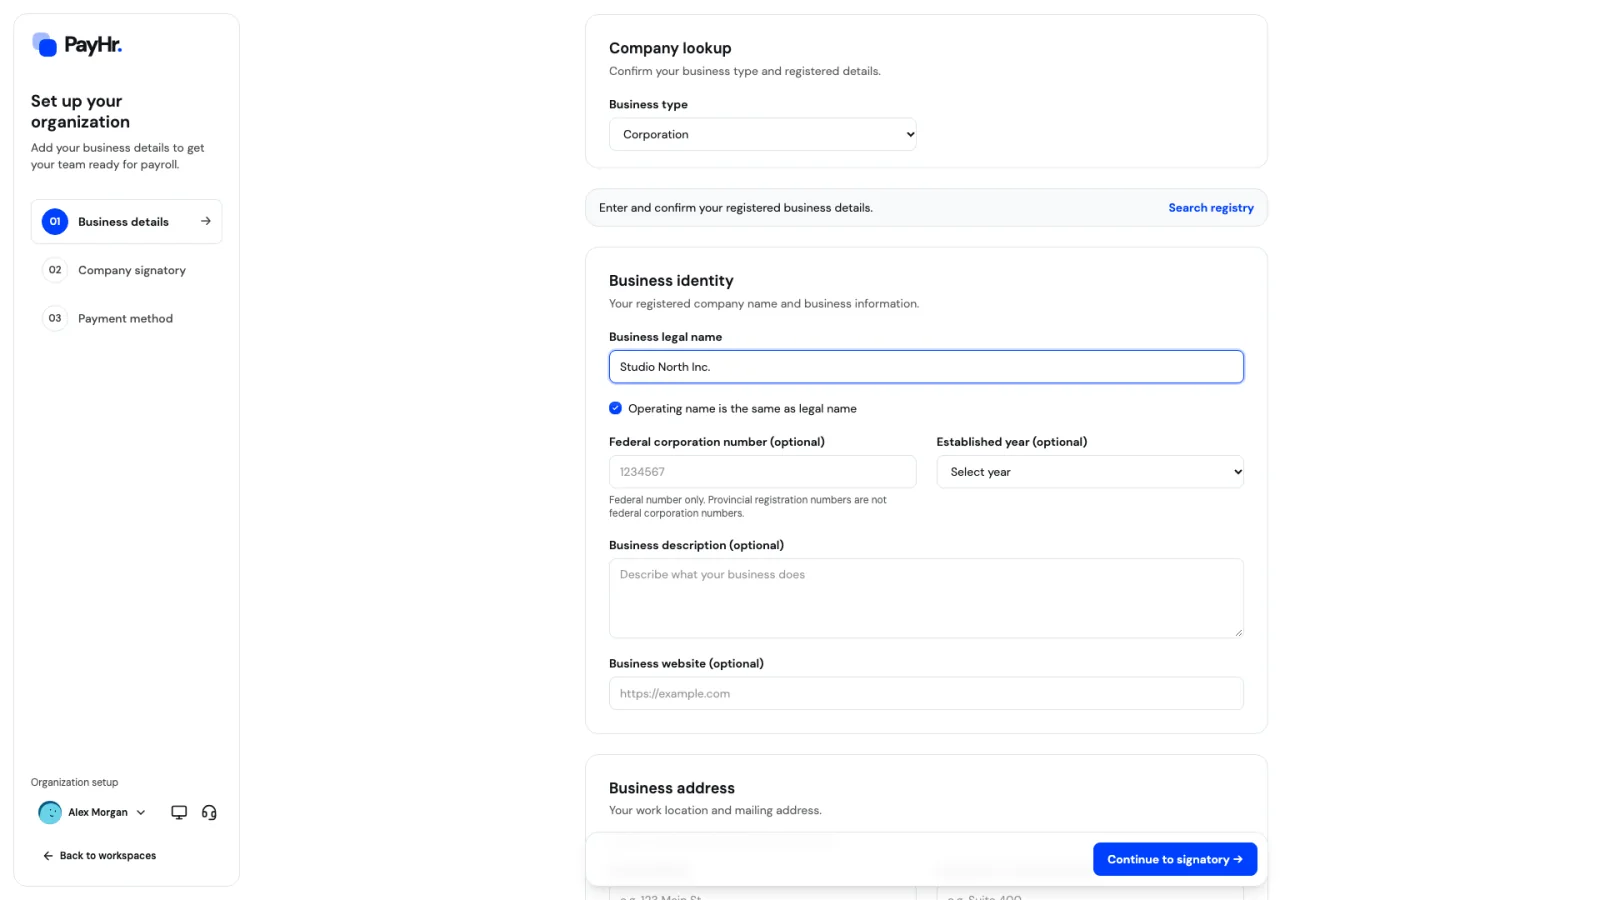
Business legal name must match your registration and your CRA records exactly. It appears on pay statements, T4 and T4A slips and Records of Employment, and a mismatch makes filings harder to match to your account.
- Operating name is the same as legal name is ticked by default. If you trade under another name, such as a numbered company operating as “Studio North”, untick it and enter the Operating name (DBA).
- Federal corporation number (optional) is the seven- or eight-digit number for federally incorporated companies only. A provincial registration number is not the same thing, so leave this blank if you are provincially incorporated.
- Established year, Business description and Business website are optional and help identify your business.
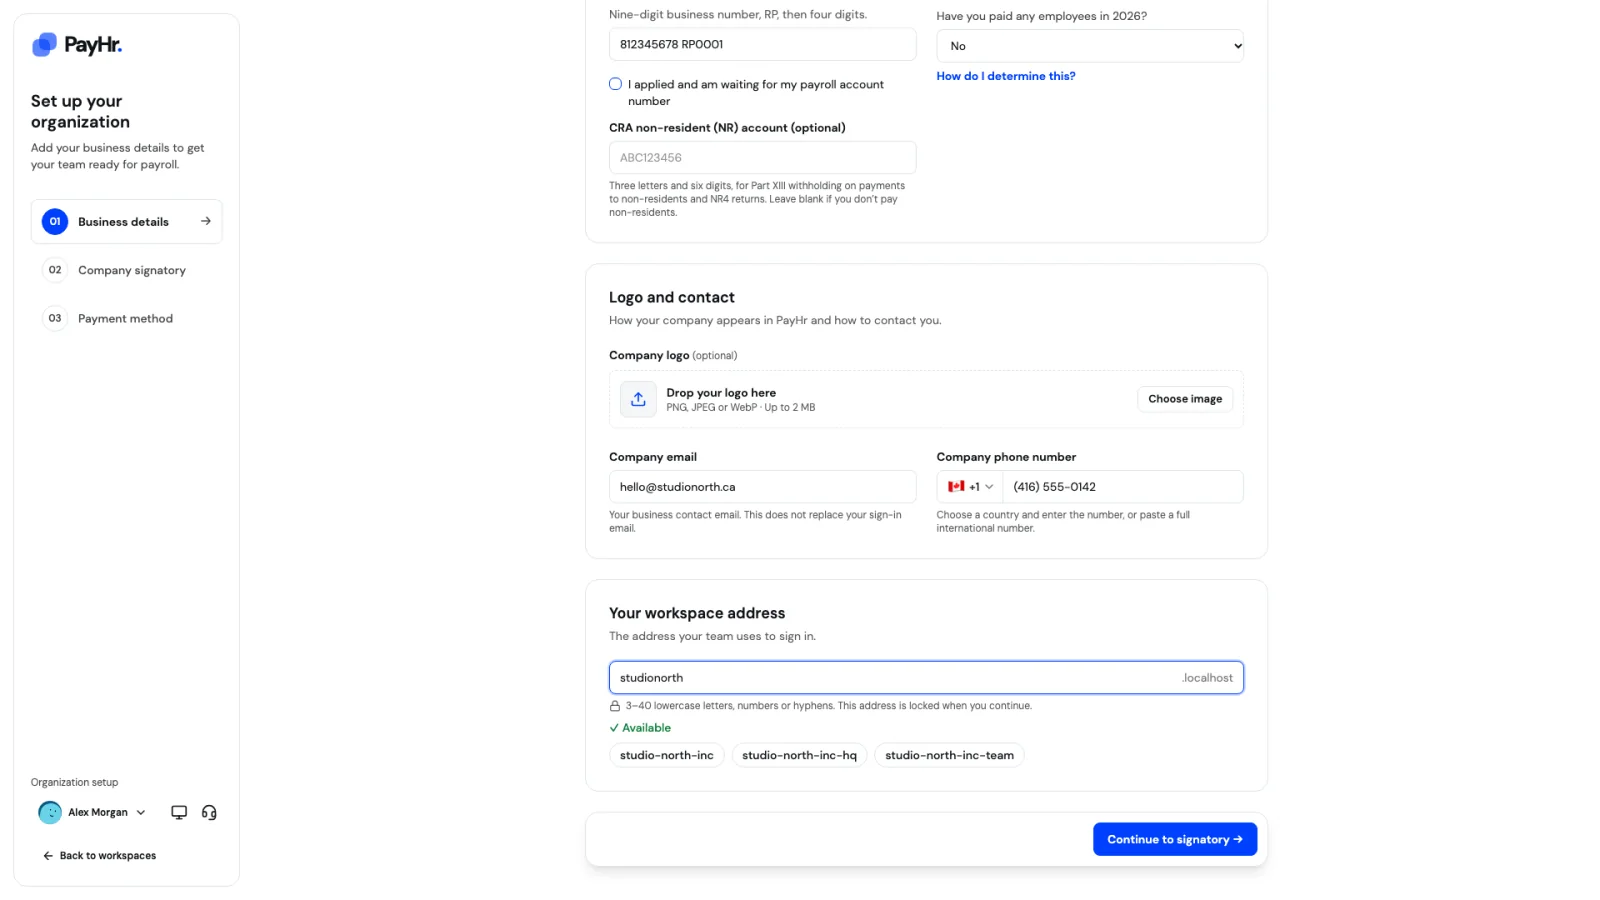
04Add your Business address and Payroll details
Business address is your work location in Canada. Your province matters: PayHr uses it as your business province for provincial defaults and recommendations. Enter Street address, an optional Apartment / suite, City, Province / territory and Postal code (format A1A 1A1). If the CRA should write to a different address, untick Mailing address is the same as business address and add it.
Under Payroll details:
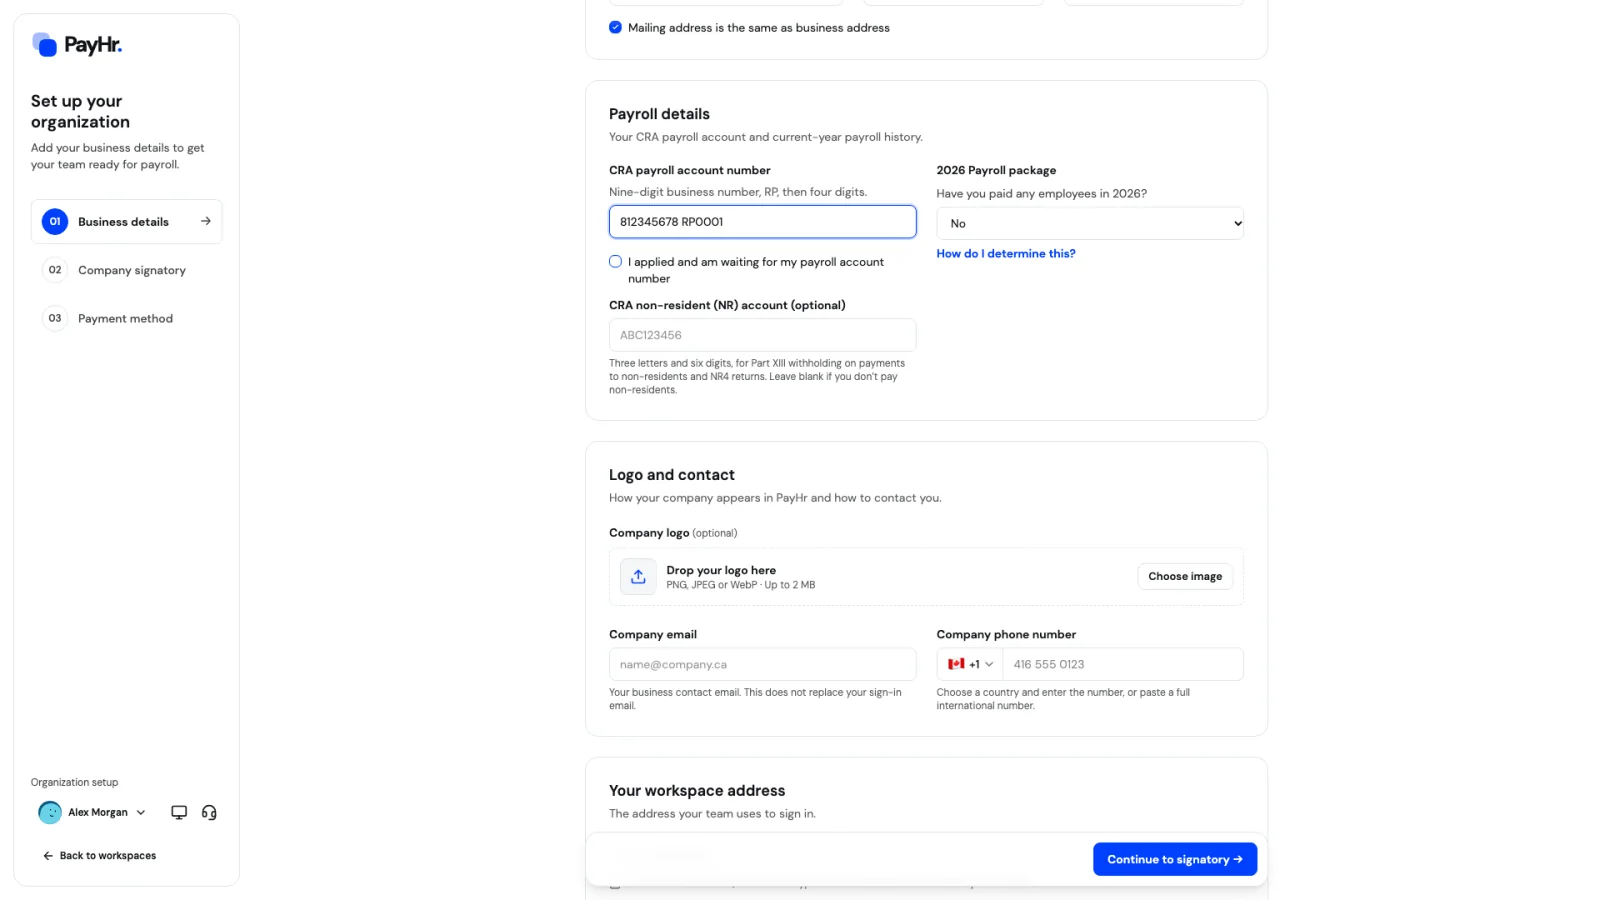
- CRA payroll account number is your nine-digit business number followed by RP and four reference digits, for example 123456789 RP0001. You use it to remit source deductions (income tax, CPP and EI) and it is printed on T4 slips and ROEs. You open it with the CRA, not with PayHr.
- Applied but still waiting? Tick I applied and am waiting for my payroll account number. You can carry on with setup, but you must add the number in Workspace Details before remittances or Records of Employment.
- CRA non-resident (NR) account is optional: three letters and six digits, only needed if you pay non-residents and file NR4 returns.
Finally, answer Have you paid any employees in [this year]? Choose Yes if you paid anyone this year, including former employees, whether you paid them manually, through an accountant or with another payroll provider. Choose No if you are hiring your first employee or haven’t paid anyone this year. Contractors don’t count. Your answer tells PayHr whether to ask for year-to-date figures, which keep CPP, EI and tax maximums right for the rest of the year. Select How do I determine this? for the same guidance on screen.
05Add your Logo and contact details
Company logo is optional. Drop a PNG, JPEG or WebP image up to 2 MB, or select Choose image. Your logo appears on your workspace card and sign-in page, and can appear on payroll PDFs.
Company email and Company phone number are how your business can be reached. They are business contact details only and do not change the email you sign in with. For the phone number, choose the country and enter the number; PayHr checks that it is a valid number for that country.
06Choose your workspace address and continue
Your workspace address is the web address your team uses to sign in, such as studionorth.payhr.ca. Use 3 to 40 lowercase letters, numbers or hyphens, starting with a letter. PayHr checks it as you type and shows ✓ Available, or suggests alternatives if it is taken.
Choose carefully: the address locks when you continue and can’t be changed later. Your business name, on the other hand, can be updated any time in Workspace Details.
Select Continue to signatory →. PayHr creates your organization, saves the business profile and moves you to step two. If anything is missing or invalid, the field is highlighted with a message, and nothing moves on until it is fixed.
07Add your Company signatory
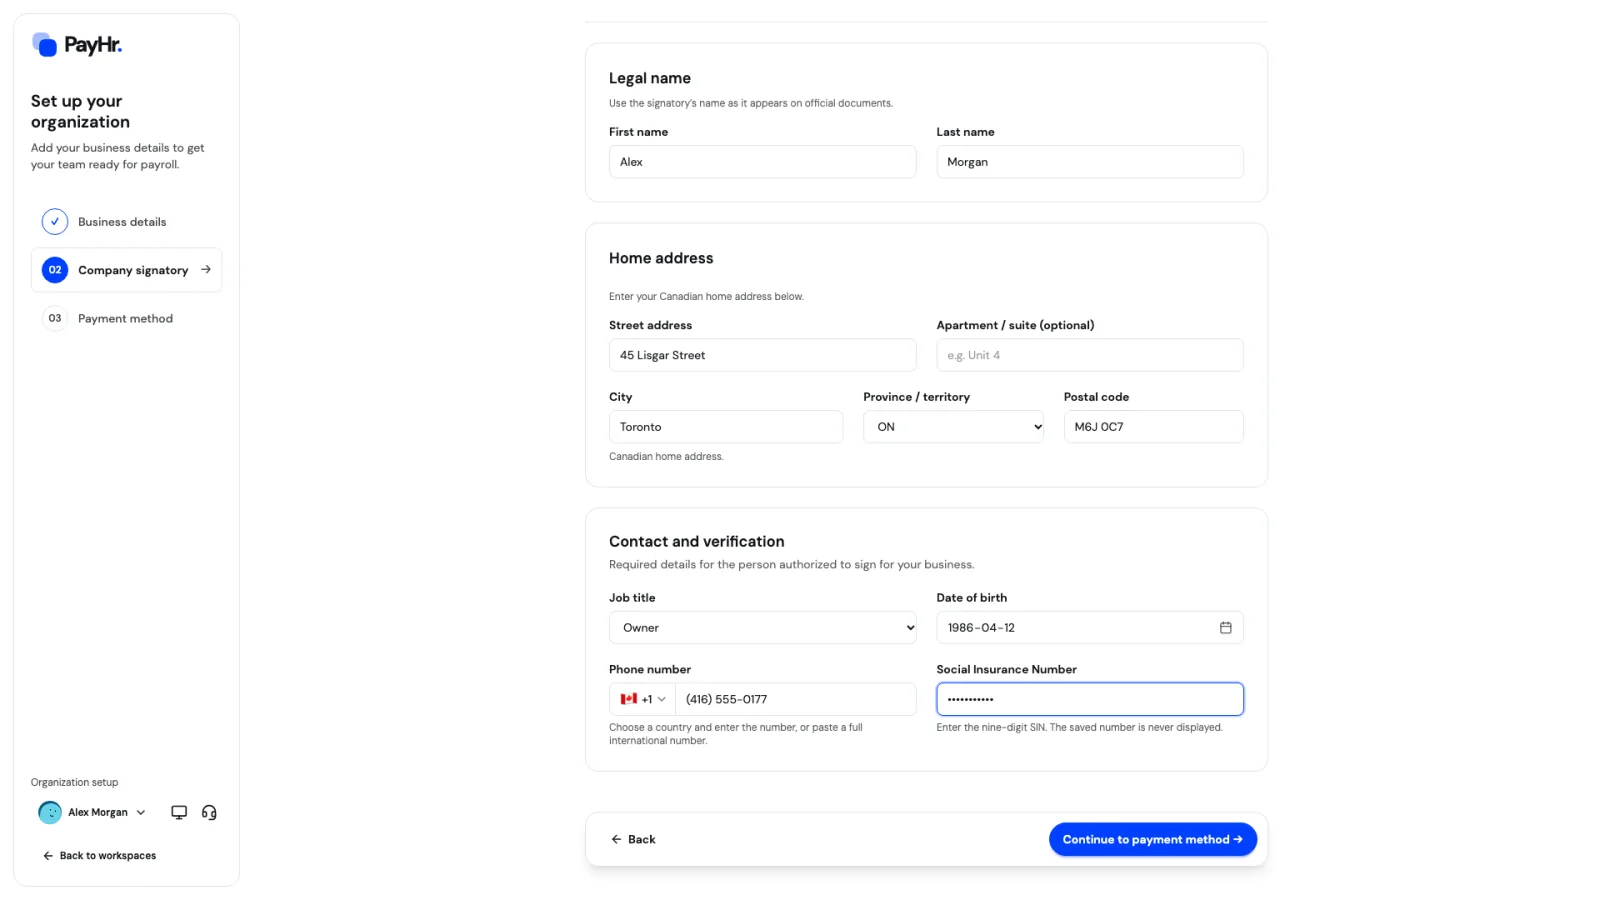
The company signatory is the person authorized to sign documents and agreements for your business, usually an owner, director or officer. Keep these details accurate and current: they identify who can sign on the business’s behalf.
- Legal name: first and last name as they appear on official documents.
- Home address: a Canadian residential address, not the business address.
- Job title: CEO, CFO, COO, Owner, President, Director or Other.
- Date of birth and Phone number.
- Social Insurance Number: nine digits. PayHr checks the number’s format and checksum, stores it encrypted, and never displays it again. If you change the signatory’s name or date of birth later, you are asked to enter the SIN again.
Select Continue to payment method →. You can update the signatory later from Workspace settings, under Company signatory.
08Review the Free Plan and save a payment method
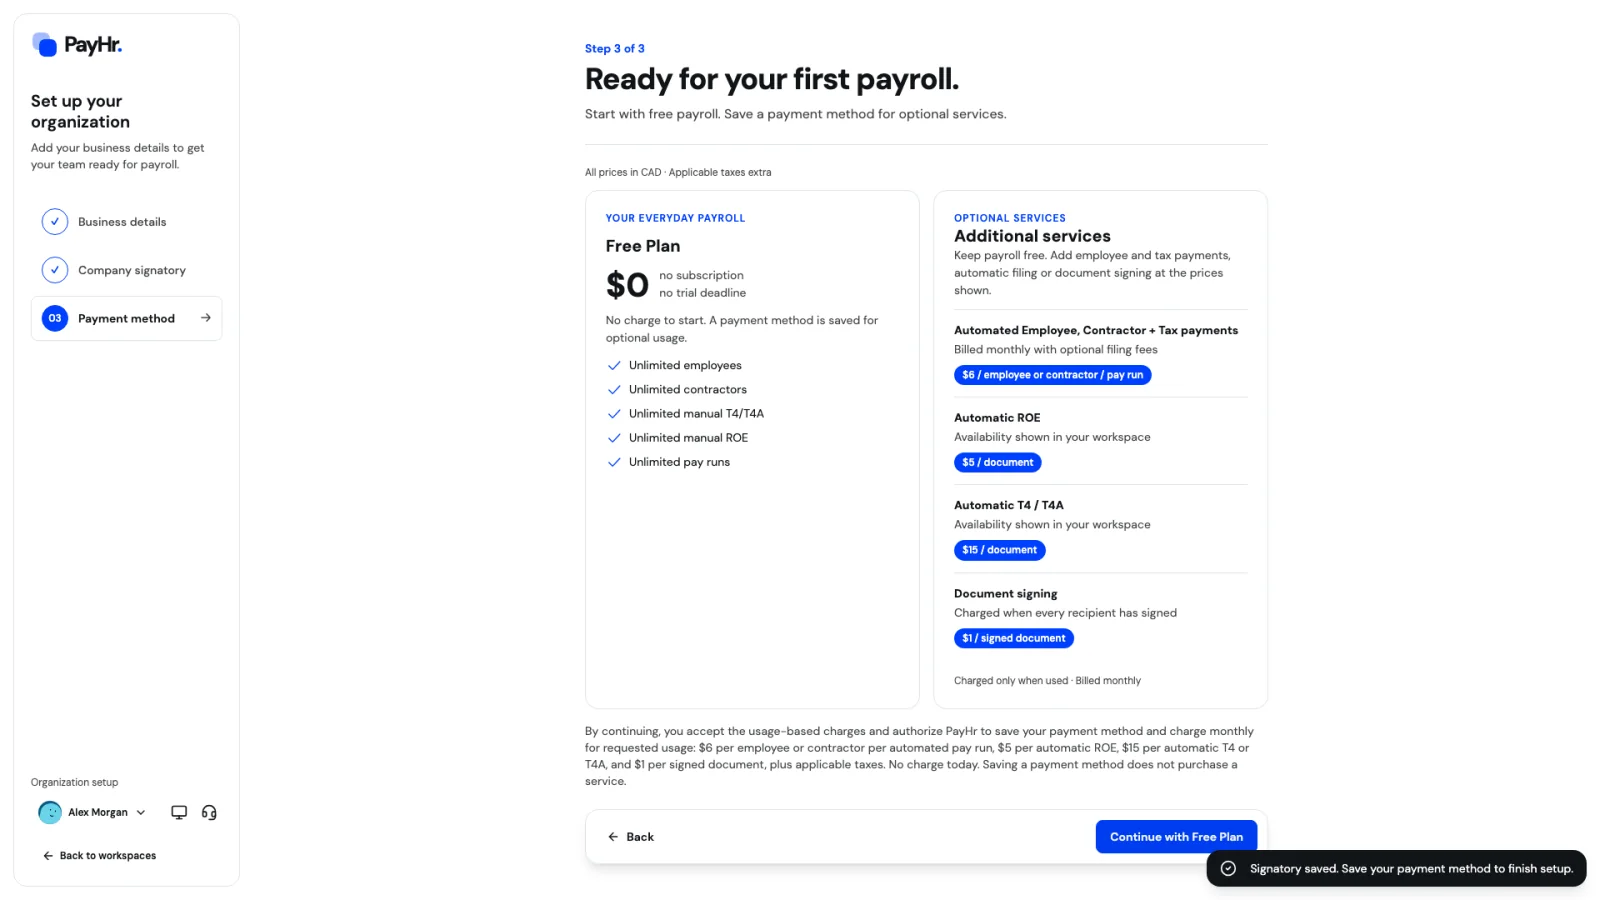
The last step shows the Free Plan: $0, no subscription and no trial deadline, with unlimited employees, contractors, manual T4/T4A, manual ROEs and pay runs.
Additional services are optional and charged only when you use them: Automated Employee, Contractor + Tax payments at $6 per employee or contractor per pay run, Automatic ROE at $5 per document, Automatic T4 / T4A at $15 per document, and Document signing at $1 per signed document. All prices are in Canadian dollars, plus applicable taxes. Where an automatic filing service is available is shown inside your workspace.
Read the consent under the plan. By choosing Continue with Free Plan, you authorize PayHr to save your payment method and charge monthly for optional services you request. There is no charge today, and saving a payment method does not buy a service. A secure payment form opens. Once your payment method is saved, setup is complete and your new workspace opens.
Questions people ask
Why does PayHr need a payment method for a free plan?
The payment method is saved so you can turn on optional services, like automated payments or automatic filing, without stopping to set up billing. You are charged only for usage you request, billed monthly. Payroll itself stays free, and no charge is made when you save the method.
I can’t find my business in the registry search. What should I do?
Select Can’t find your business? Enter details manually. Canadian Business Registries doesn’t cover every provincial registration or sole proprietorship. Manual entry gives you the same workspace. Just make sure the legal name matches your CRA records.
What if I answered the payroll history question wrong?
You can change it in Workspace Details, in the Payroll section. If you have already paid employees this year, answer Yes so you can enter year-to-date amounts before your first PayHr payroll. Otherwise CPP, EI and tax maximums may be calculated as if the year started fresh.
Can I change my workspace address later?
No. The workspace address locks when you select Continue to signatory, because your team’s sign-in links depend on it. Your business name, logo and contact details can be changed any time.
Who should be the company signatory?
Someone with authority to sign for the business, such as an owner, director or officer. It doesn’t have to be the person setting up PayHr. Use their own legal name, home address and SIN.
My business has employees in Quebec. Can I use PayHr?
PayHr supports payroll in every Canadian province and territory except Quebec. Quebec payroll has its own provincial tax and pension rules (Revenu Québec and the QPP), which PayHr doesn’t calculate.