TAXES & COMPLIANCE
Prepare and file a Record of Employment (ROE)
A Record of Employment (ROE) tells Service Canada how many insurable hours and earnings an employee had, so they can apply for Employment Insurance benefits. This guide shows how PayHr prepares the ROE from your approved payroll, how you file it in ROE Web, and how to keep the issued copy with the employee's record. It is for owners and admins.

 NARRATED TUTORIALWatch: Prepare a Record of EmploymentSee every step below in the actual PayHr screens, with captions.
Before you start
- The leave or offboarding recorded on the employee's Employment status page, with the last day paid and the reason
- Every pay run up to the last day paid approved, including the final pay and any vacation pay owing
- The employee's SIN, home address and occupation saved in their employee details
- A default issuing officer (name and phone) under Settings > ROE contact
- Access to Service Canada's ROE Web for your business, if you file manually
01Know when an ROE is needed
You must issue an ROE whenever an employee has an interruption of earnings: they stop working and receive no insurable earnings for seven days in a row, or they leave the company. Typical cases are a resignation, a layoff for shortage of work, a dismissal, or an unpaid leave such as parental, sickness or compassionate care leave.
In PayHr, an interruption starts on the employee's profile: open the employee, go to Employment status, and choose Place on leave or Offboard. You enter the effective date, the last day paid and the reason once, there. PayHr then lists the employee on the ROE dashboard.
- A paid leave keeps insurable earnings coming, so there is no interruption: the row shows No ROE · paid leave.
- Someone who was never paid has nothing to report: the row shows Not needed.
02Open the ROE dashboard
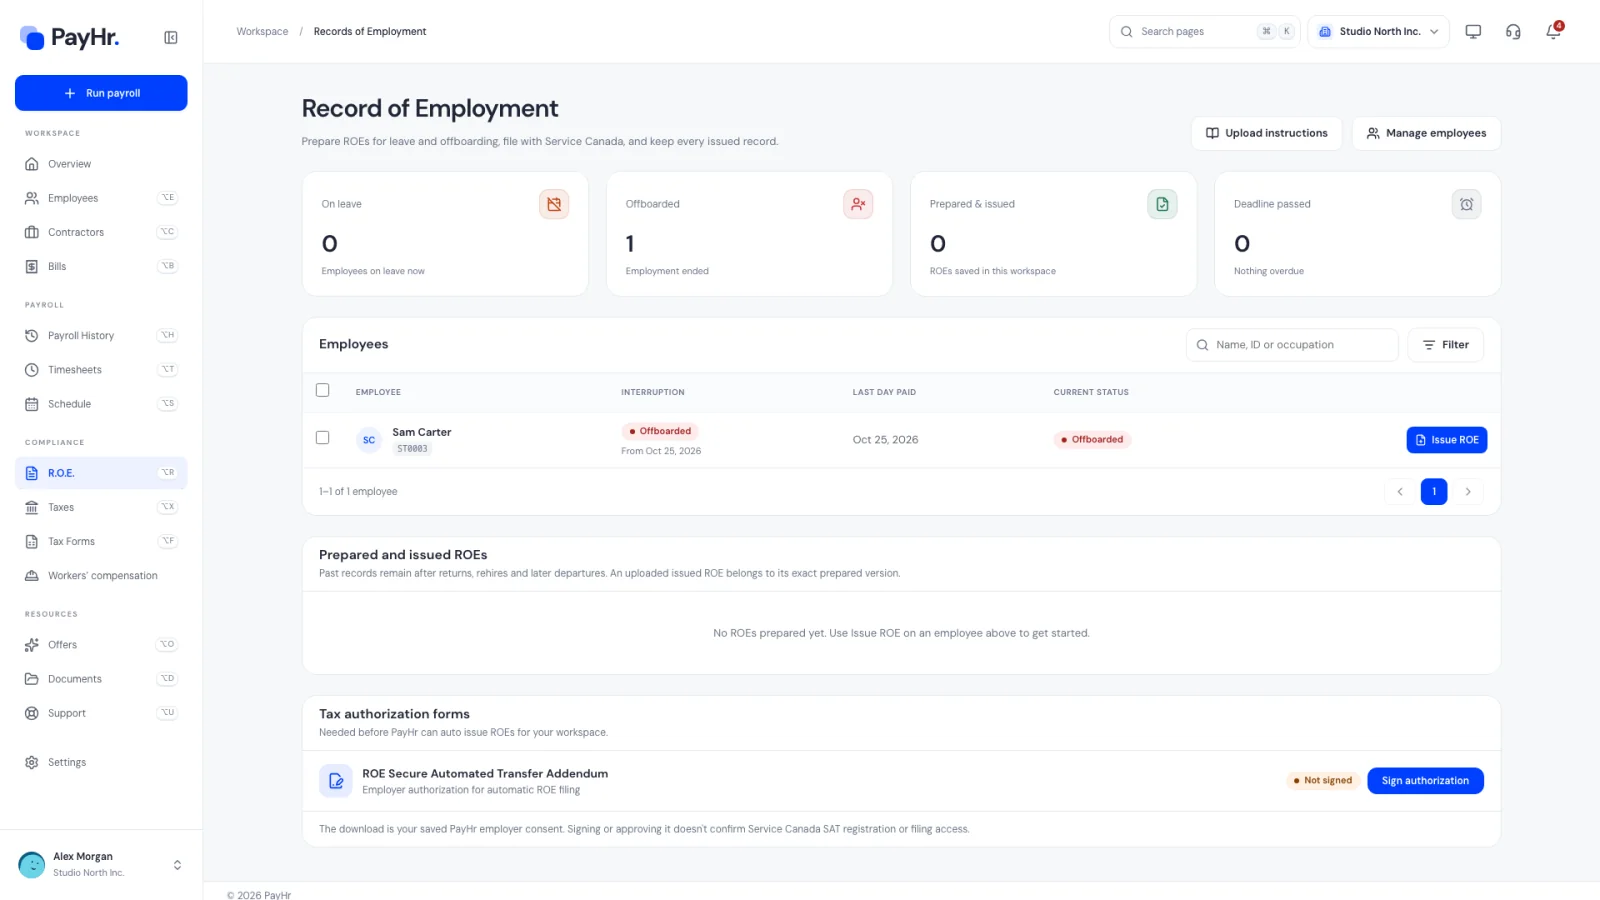
Select R.O.E. in the sidebar. The Record of Employment page has four cards:
- On leave and Offboarded: employees with that status now. Select a card to filter the list below; select it again (or its x) to clear the filter.
- Prepared & issued: ROEs saved in this workspace.
- Deadline passed: ROEs prepared but not filed in time. Aim to keep this at zero.
The Employees table lists each interruption with its type, the Last day paid and the employee's current status. Use the search box (name, ID or occupation) and Filter to show only on leave or offboarded employees, or to include past interruptions. Upload instructions at the top opens PayHr's step-by-step guide to uploading the XML in ROE Web.
03Fix payroll issues first, if any
An ROE reports insurable hours and earnings for every pay period, ending with the pay period that contains the last day paid. If an approved pay run is missing insurable hours or earnings for the employee, the row shows Resolve issue instead of Issue ROE. Select it to see which pay periods need attention and fix them on the employee's payroll before you continue.
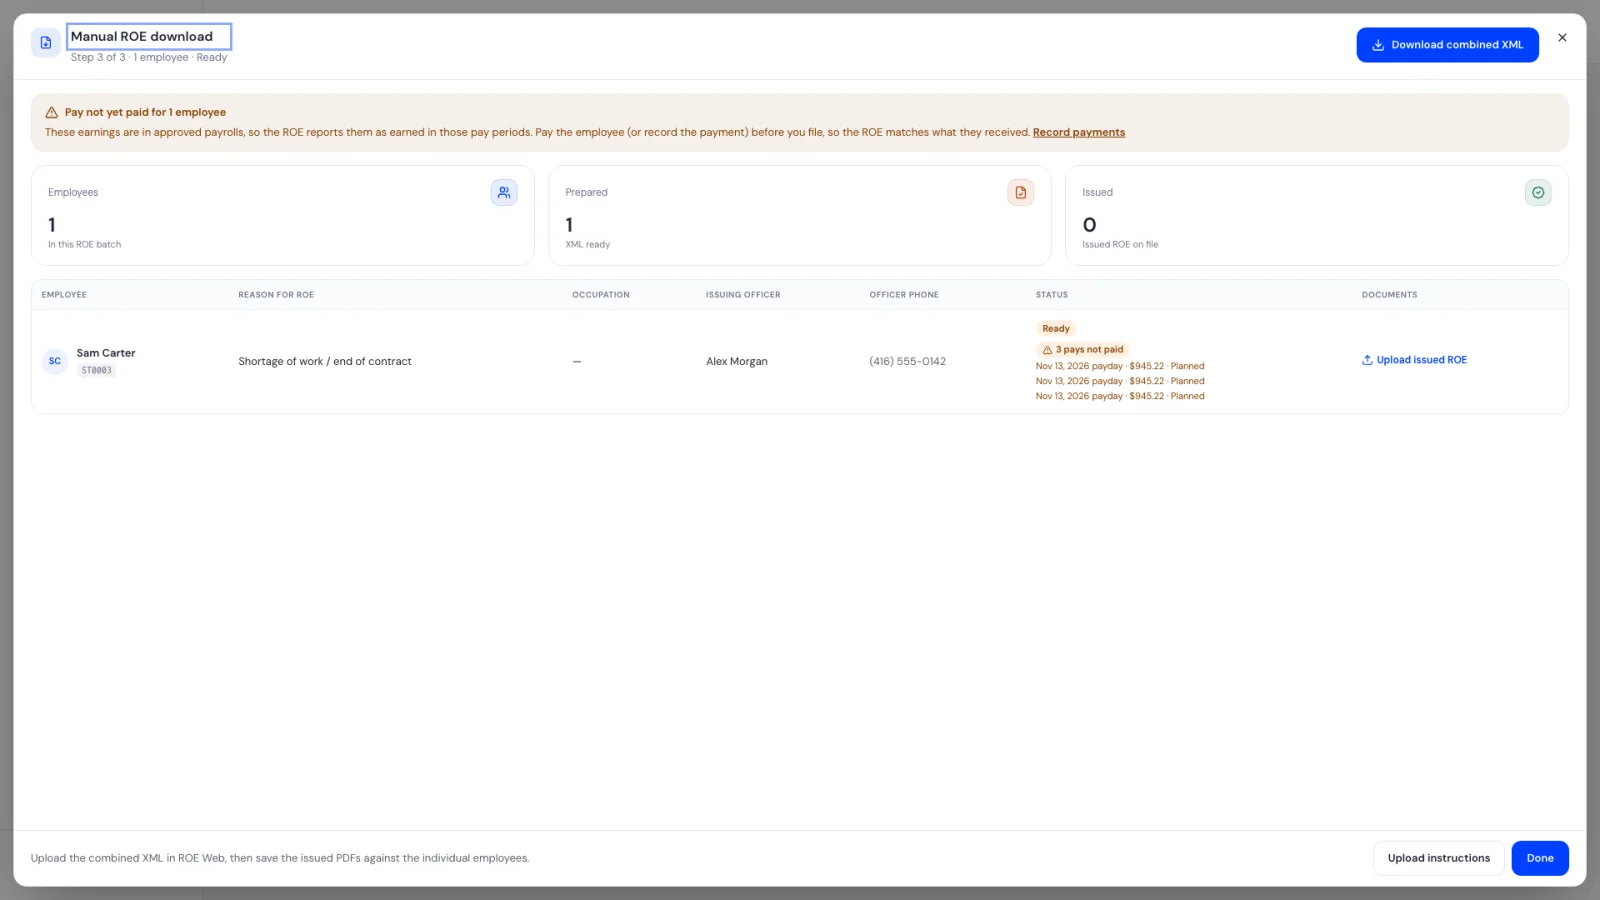
Also make sure the final pay, including any vacation pay owing, is in an approved pay run. If approved earnings haven't actually been paid yet, PayHr warns you with Pay not yet paid so that the ROE matches what the employee received.
04Select Issue ROE and choose how to file
Select Issue ROE on the employee's row. To prepare several at once, tick their checkboxes and use Manual ROE for selected in the bar that appears.
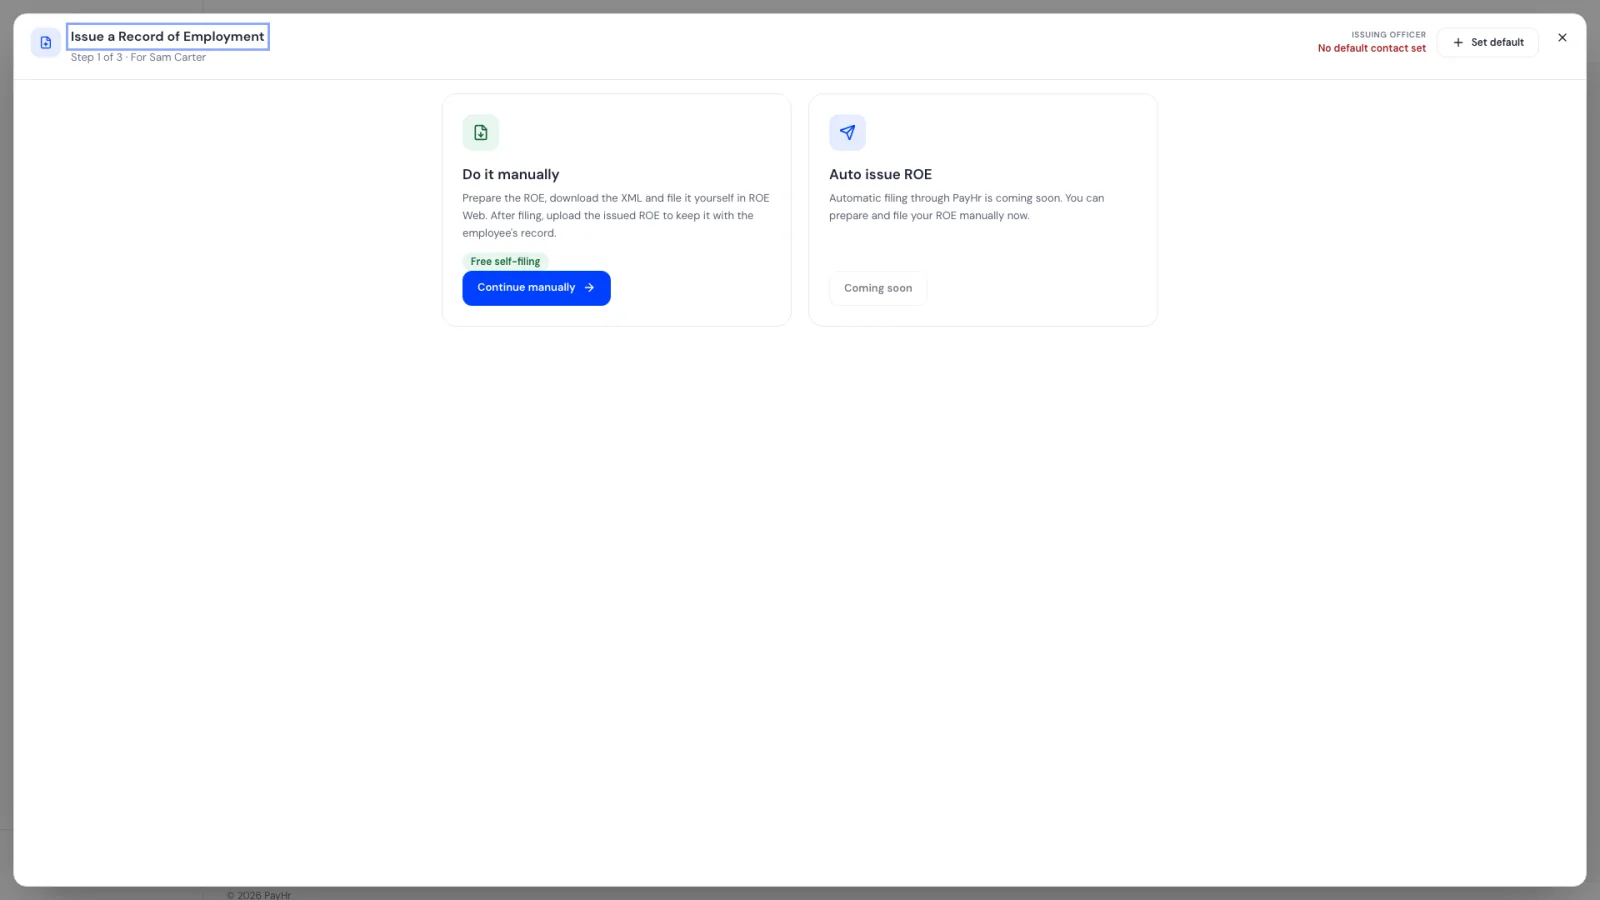
Step 1 asks how you want to file:
- Do it manually (Free self-filing): PayHr prepares the ROE file; you upload it in Service Canada's ROE Web and then save the issued ROE back in PayHr. Select Continue manually.
- Auto issue ROE: PayHr files the ROE with Service Canada for you, as a paid option charged per ROE. Its availability is shown on this card in your workspace; when it isn't available the button reads Coming soon.
05Check the issuing officer and employee details
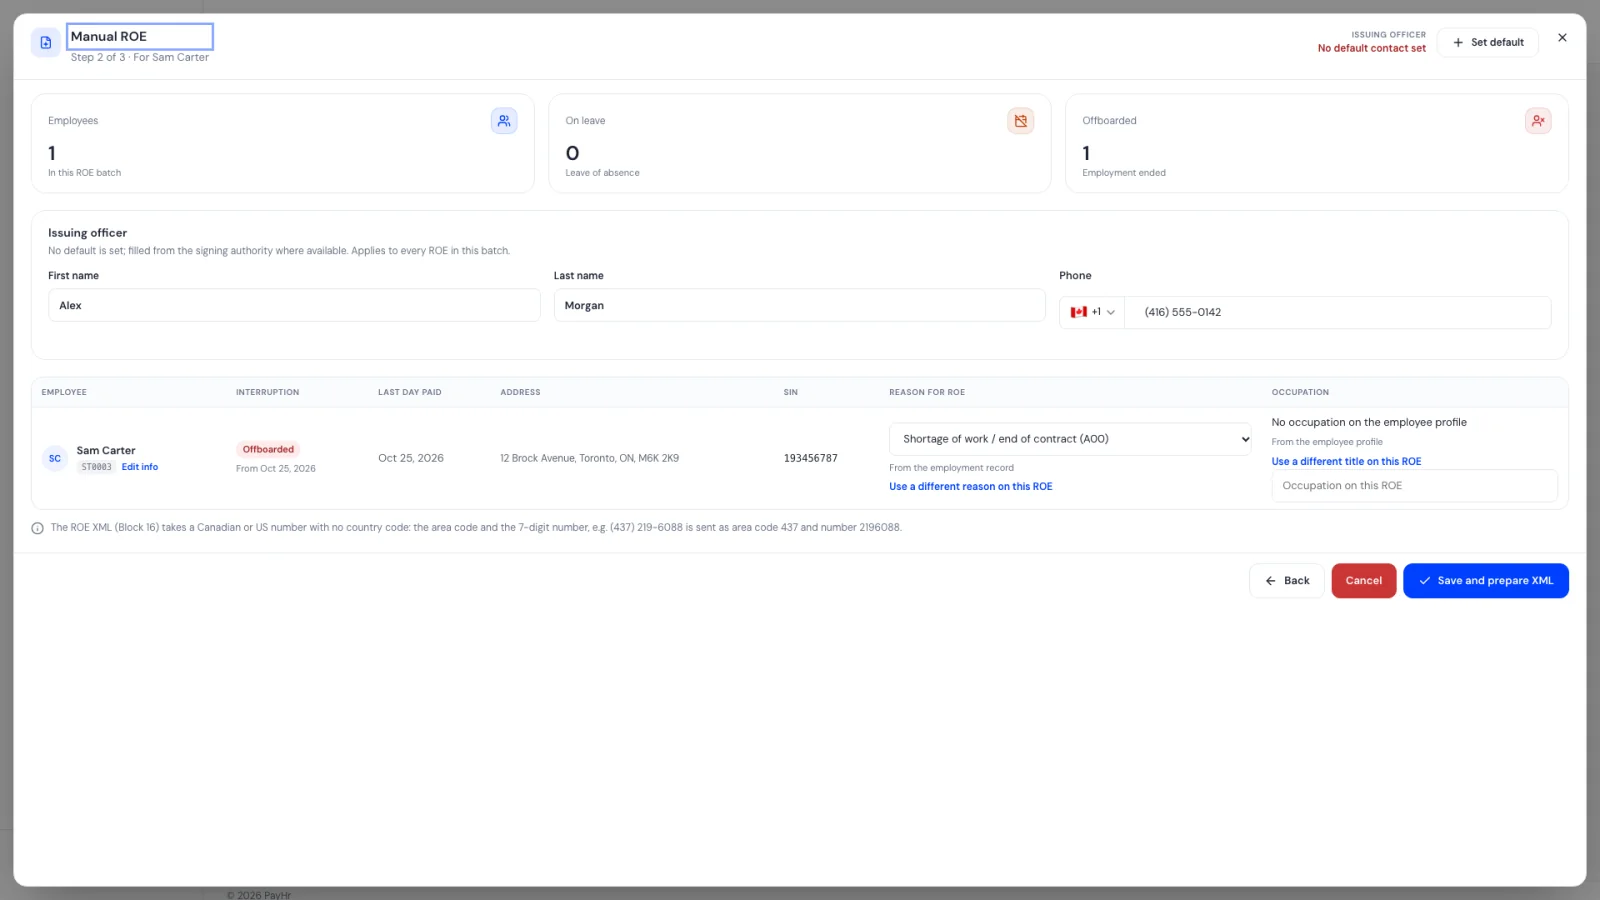
Step 2 shows everything that goes on the ROE.
- Issuing officer: the person Service Canada contacts with questions about the ROE (Block 16). It is filled from your default ROE contact, or from your signing authority if no default is set. The phone number is sent as an area code and a seven-digit number. It applies to every ROE in this batch; change the default with Change default.
- Address, SIN and Last day paid come from the employee's records. If the leave record has no last day paid, enter it here; it is highlighted so you check it.
- Reason for ROE comes from the employment record. You can refine it to a more specific code in the same family (for example a specific type of quit), or choose Use a different reason on this ROE; that changes this ROE only, never the employment record. Reasons such as Other require a Comment for Service Canada (Block 18).
- Occupation comes from the employee profile; you can type a different title for this ROE only.
The reason code matters: Service Canada uses it to decide whether the employee qualifies for EI benefits, so choose the one that truly describes why earnings stopped. Select Save and prepare XML.
06Download the XML and file it in ROE Web
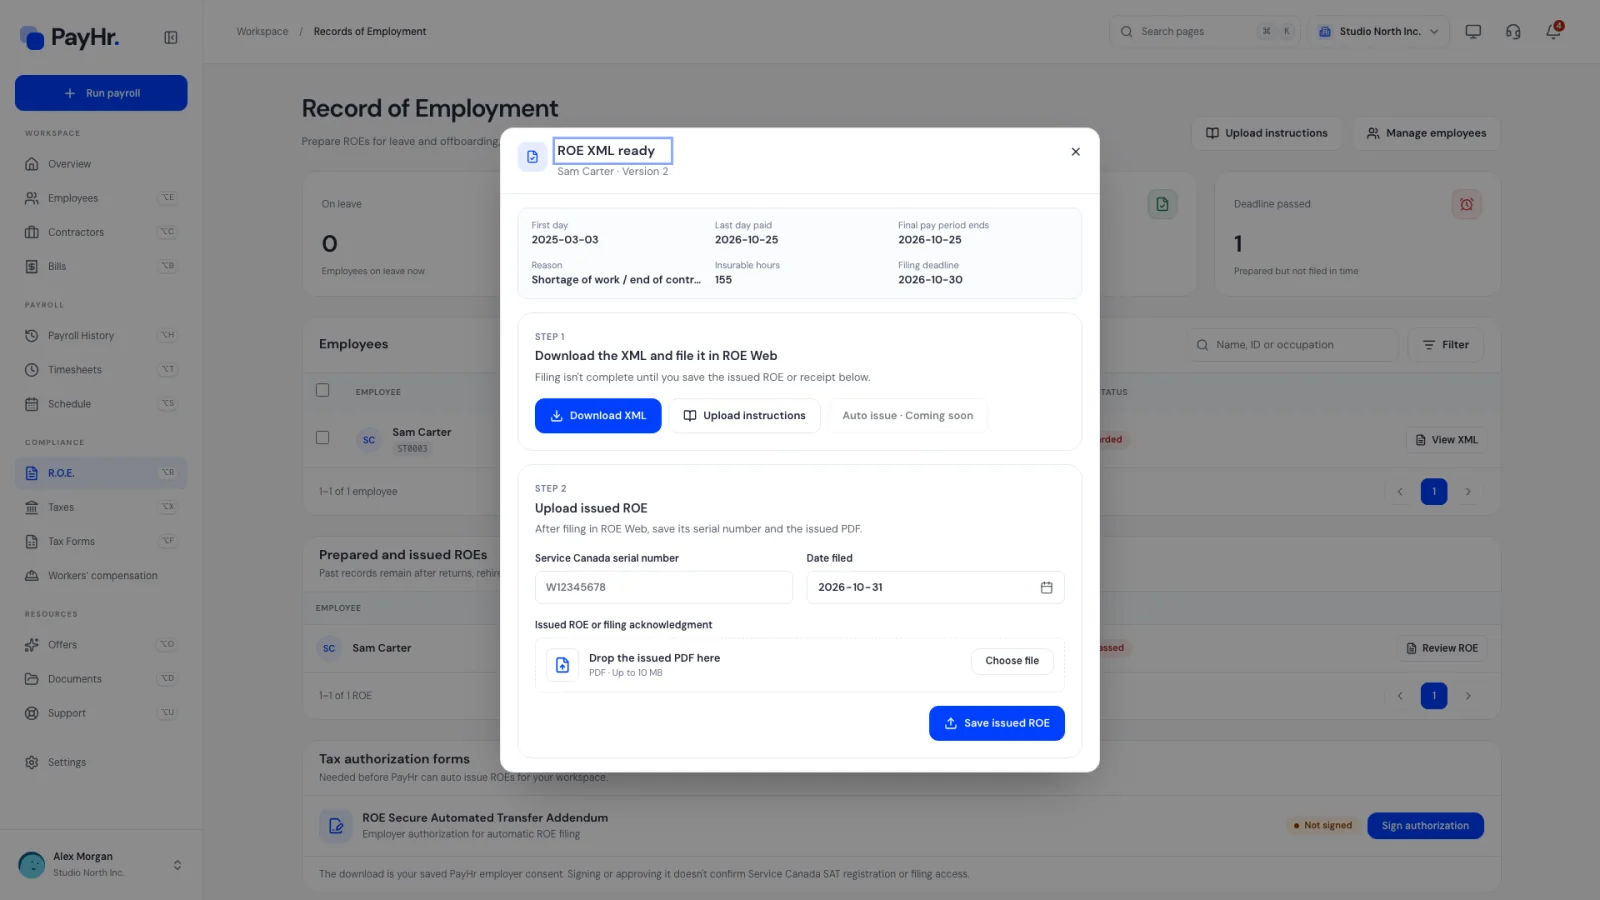
Step 3, Manual ROE download, summarises the batch: employees, ROEs Prepared (XML ready) and ROEs Issued. PayHr has built each ROE from approved payroll: the first day worked, the last day paid, the final pay period end, insurable hours and earnings per pay period, and any vacation pay or other money paid on separation.
Select Download combined XML, sign in to ROE Web and upload the file. ROE Web checks the file and issues each ROE with a serial number. PayHr has not filed anything at this point: filing happens only when you upload in ROE Web.
Deadline: an electronic ROE is generally due within five calendar days after the end of the pay period in which the interruption happened. PayHr shows the date as Filing deadline on each prepared ROE (for monthly pay periods it uses the earlier of that date and fifteen days after the interruption). If payroll changes after you prepare, PayHr flags the ROE and asks you to prepare a new version before filing.
07Save the issued ROE
Back on the dashboard, find the ROE under Prepared and issued ROEs. Its status reads Prepared · awaiting filing (or Prepared · deadline passed once overdue). Select Review ROE.
Under Upload issued ROE, enter the Service Canada serial number and drop the issued PDF or filing acknowledgment from ROE Web (up to 10 MB), then select Save issued ROE. The status changes to Issued ROE / receipt uploaded, and the popup then offers Download issued ROE and the original XML.
Keep this step: filing isn't complete in PayHr until the issued ROE is saved, and it gives you proof of filing if the employee or Service Canada asks. Employers must keep ROE records for six years.
08Review the ROE authorization
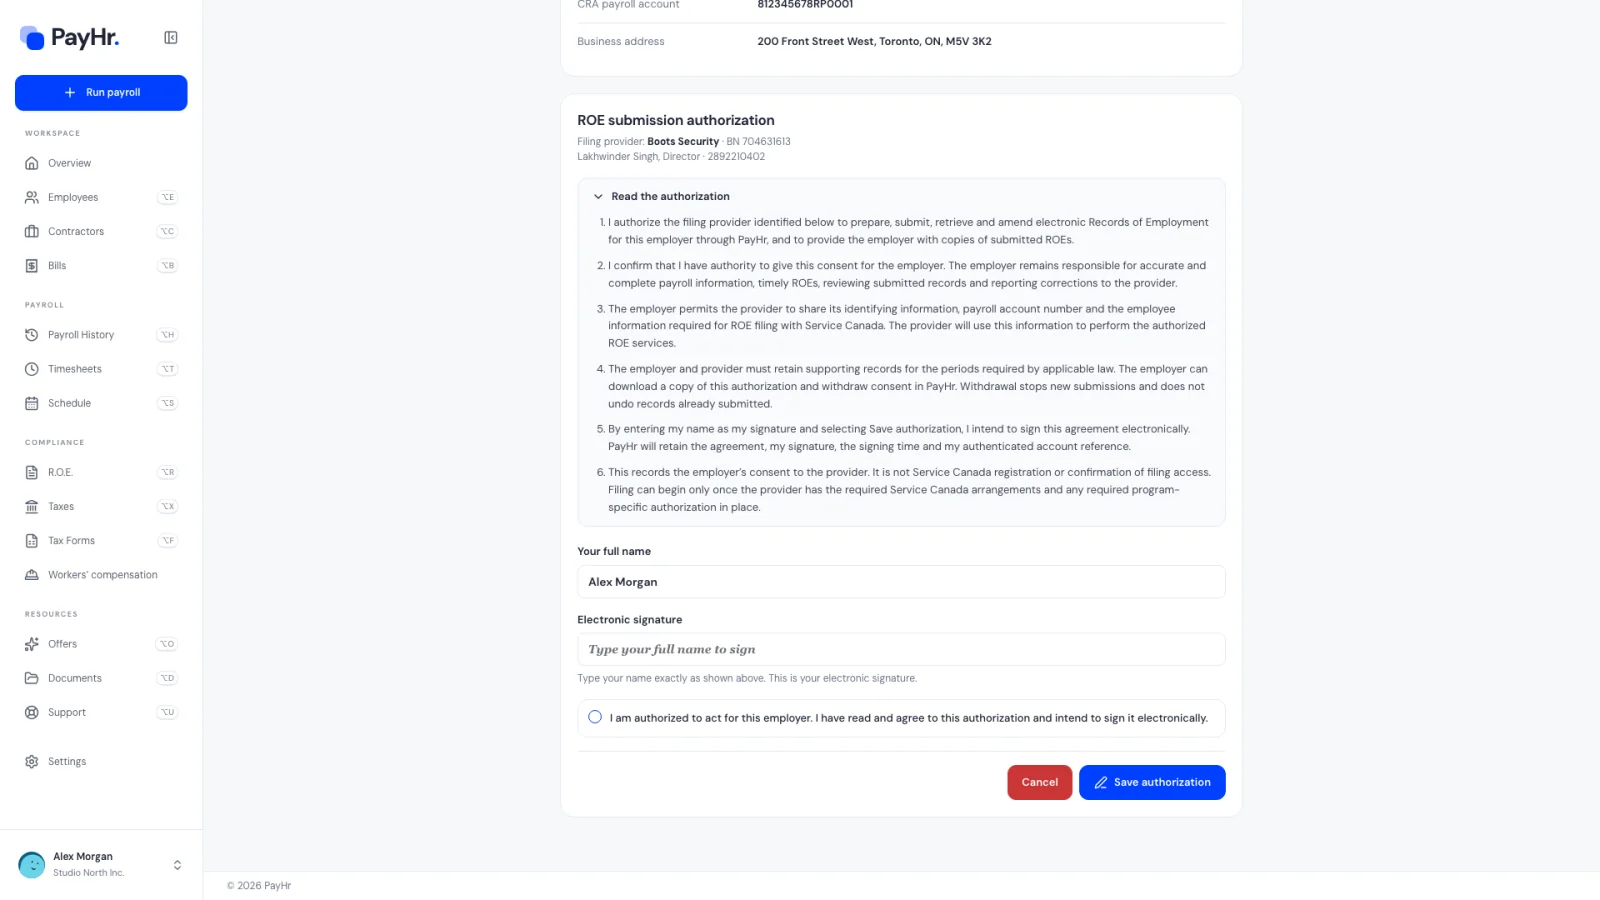
At the bottom of the dashboard, Tax authorization forms shows the ROE Secure Automated Transfer Addendum and whether it is signed. Select Sign authorization (or Review) to open it.
The page shows your business details (legal name, CRA payroll account, address) and the filing provider's details, then the authorization text. Signing means typing your full name, typing it again as your electronic signature and confirming you are authorized to act for the employer. You can download the signed copy and withdraw it later.
This authorization is only needed for automatic ROE filing. It is your saved consent; it does not register you with Service Canada or confirm filing access, and manual filing in ROE Web doesn't need it.
Questions people ask
How quickly do I have to issue an ROE?
For electronic ROEs, generally within five calendar days after the end of the pay period in which the interruption of earnings happened. PayHr calculates the date for each ROE and shows it as the Filing deadline, and counts any that are late under Deadline passed.
Does PayHr send the ROE to Service Canada?
With manual filing (free), no: PayHr prepares the XML and you upload it in ROE Web. Automatic issuing is a separate paid option, and its availability is shown on the Issue ROE popup in your workspace.
Do I need an ROE when someone goes on vacation or paid sick leave?
No. An ROE is needed only when insurable earnings stop. A paid leave keeps earnings coming, which is why PayHr shows No ROE · paid leave for those employees.
Why does the row say Resolve issue?
One or more approved pay runs for that employee are missing insurable hours or earnings, which every ROE pay period needs. Select Resolve issue to see the affected periods, correct them, and the button changes to Issue ROE.
Can I prepare ROEs for several employees at once?
Yes. Tick each employee in the table and choose Manual ROE for selected. PayHr prepares them as one batch with a single combined XML file to upload in ROE Web. Afterwards, save each employee's issued ROE individually.
Where do I find an ROE I issued earlier?
Under Prepared and issued ROEs on the dashboard. Past ROEs stay there after returns, rehires and later departures. Select Review ROE to download the issued ROE or the original XML.